FAQ
Table of Contents
- Introduction
- Program Toggle
- Claim your Account
- Edit Account Information
- Manage Company Users
- Company Status
- Manage Company Contacts & Locations
- New and Existing Applications
- Product Rating Dashboard
- Submitting an Application
- Wall AMTL Color Family Additional Element Applications
- Creating an Invoice
- Paying an Invoice
- Application Status Flow
- Validation Testing
Introduction
The CRRC Online Rating Portal, or “Portal,” is the CRRC’s way to manage program participation. For the Roof and Wall Rating Programs, the Portal is where you will submit and manage product rating applications and is a hub that connects your application with you, CRRC staff, and the Test Lab and Test Farm you select to conduct testing and weathering. Licensees and Members can manage User and Contact information and pay fees and annual renewals through the Portal’s invoicing function.
This user manual is a brief introduction to the Portal and includes instructions for logging in, setting up accounts for staff members in your company, using the dashboard, submitting a product rating application, and generating and paying invoices.
If you have additional questions or need assistance, please send inquiries to [email protected].
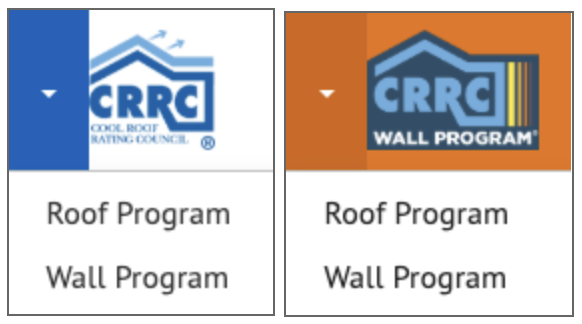
Program Toggle
If you participate in both the Roof and Wall Rating Programs, you have the ability to toggle between both programs (see image below). While Users, Contacts, and Invoices can be managed for both programs from either Portal, Product Rating Applications can only be submitted and managed through each specific program Portal.
If you only participate in the Roof or Wall Rating Program, not both, you will only have access to that program Portal. If a Roof and/or Wall Licensee is also a CRRC Member, the Member Program is managed through both the Roof and Wall Rating Program Portals and does not have its own separate program Portal.
Claim your Account
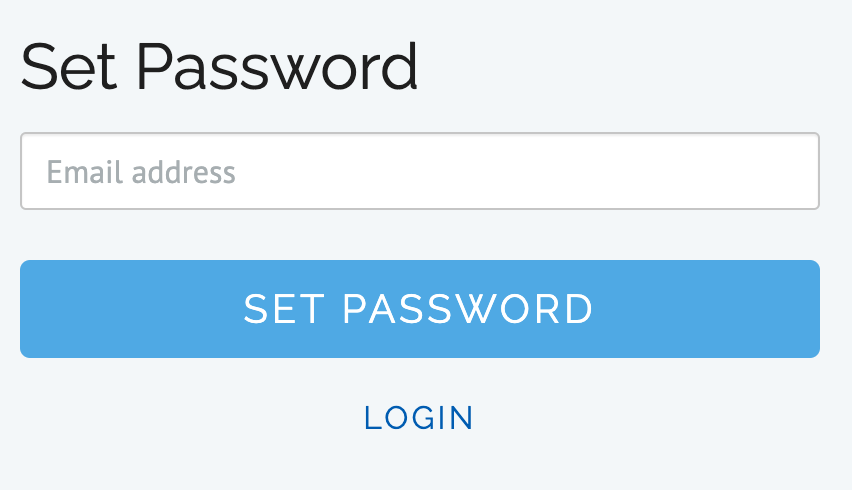
If a Portal User account has been created for you, you will receive an email with a link to set your password.
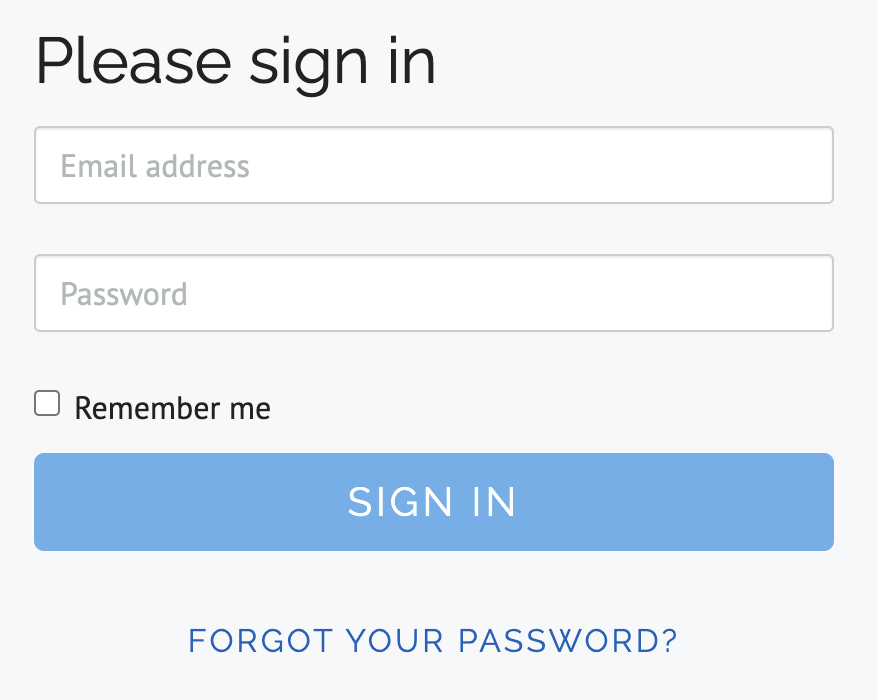
If you already have a User account but forgot your password:
- On the login screen, click on “Forgot your password?”
- Enter the email address associated with your User account.
- You will receive an email with a unique link, click on it and reset your password there.
- Now you are able to log in using your email address and password.
Edit Account Information
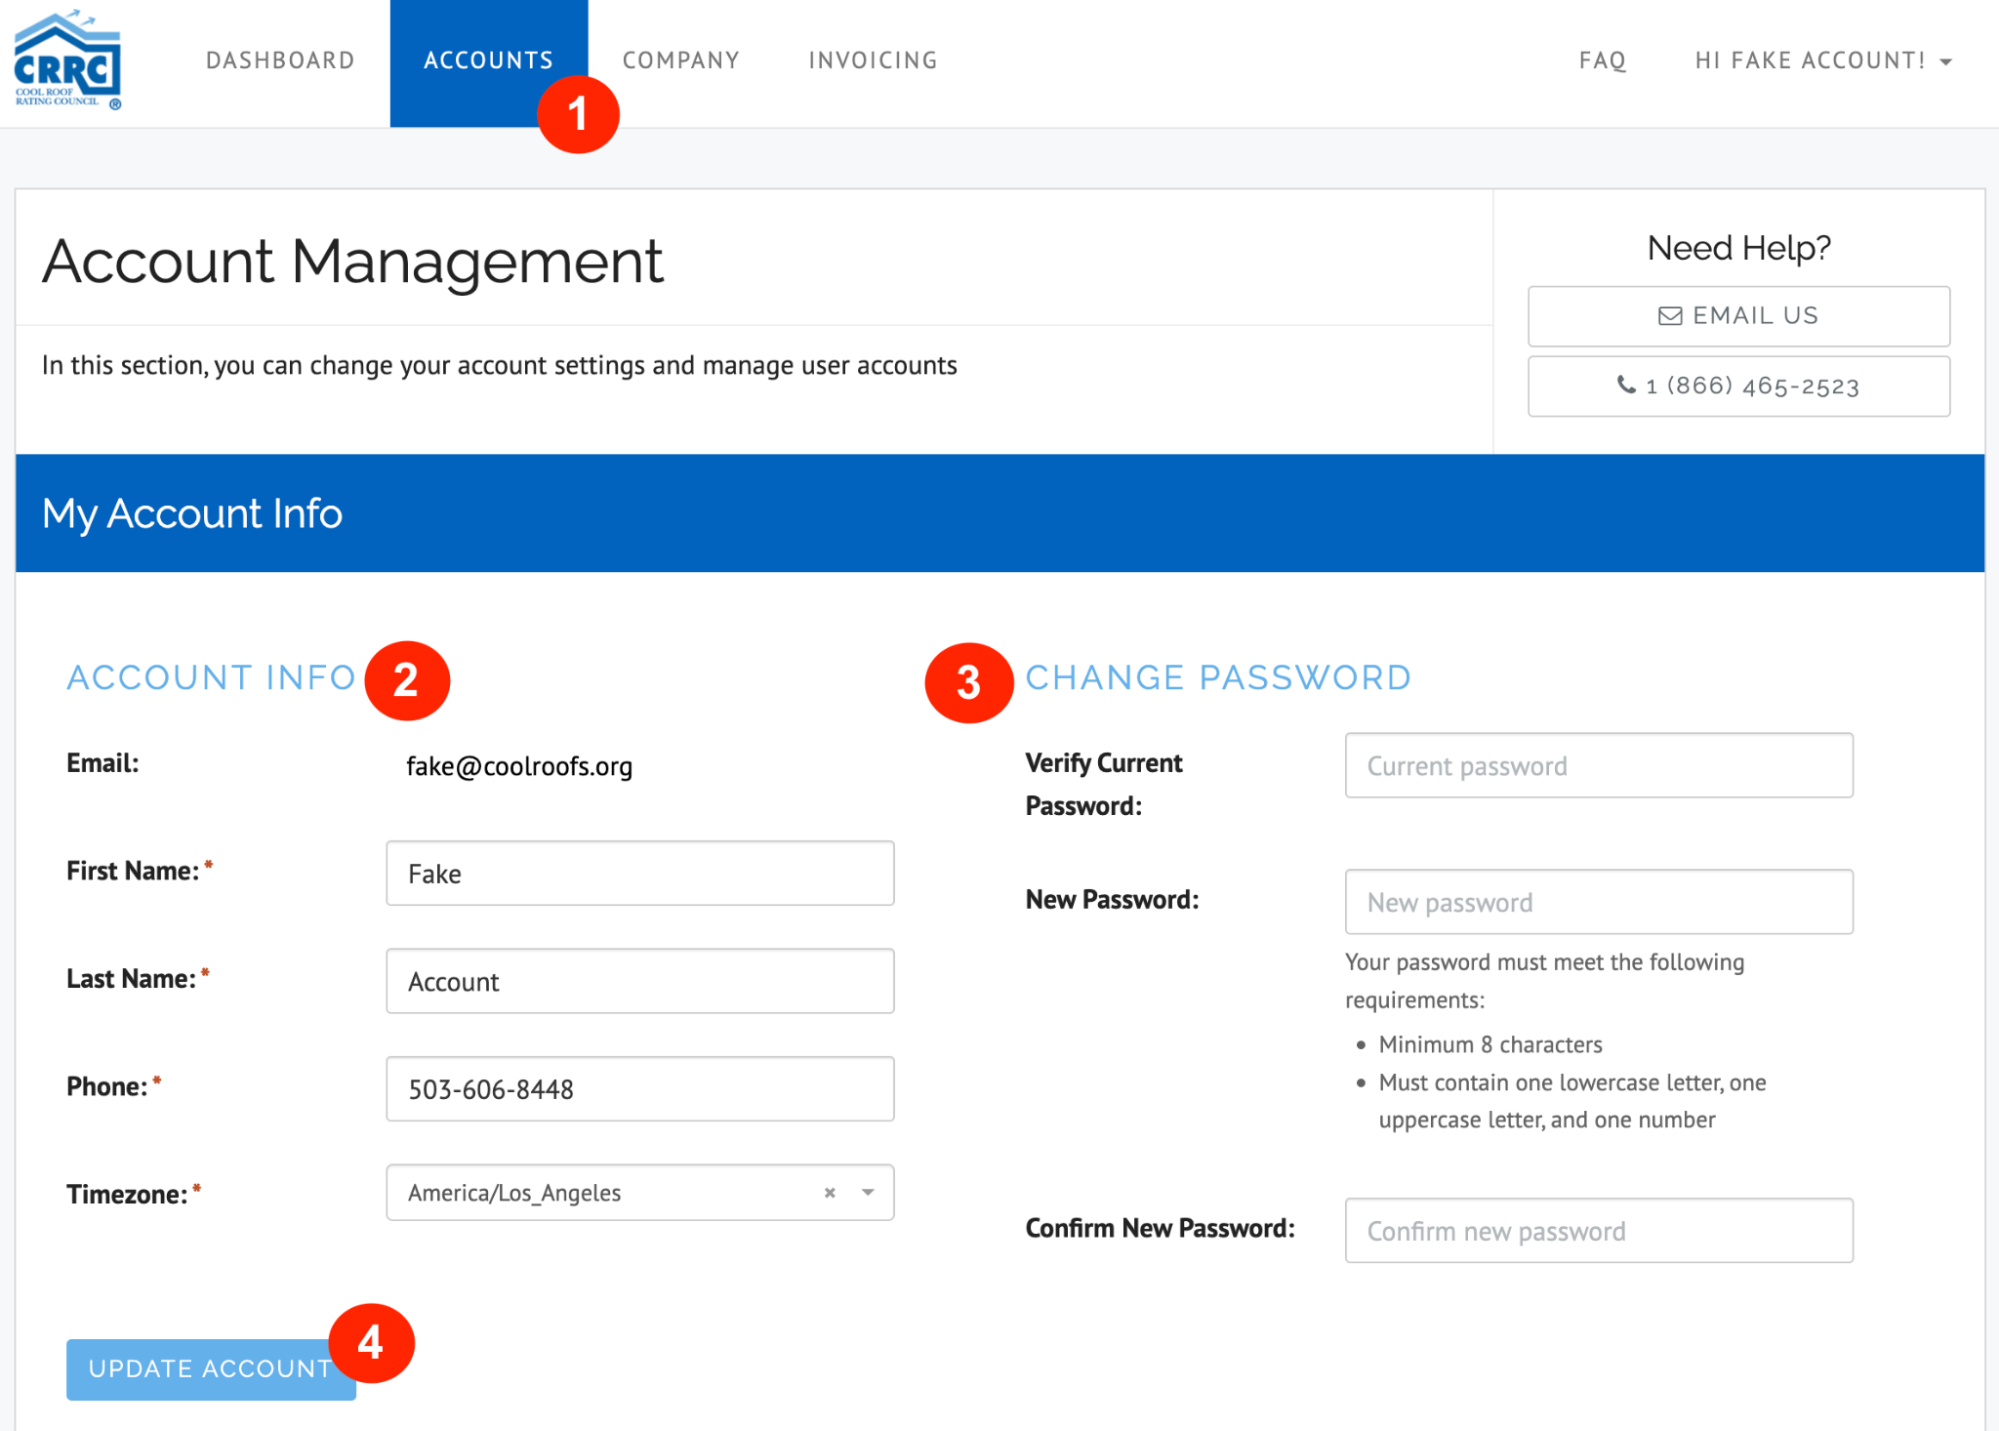
Confirm we have your most up-to-date contact information:
- Navigate to “Accounts” in the top menu.
- Add or edit your contact information. Email addresses are used to login, so this cannot be changed. If you have changed your email, please set yourself up with a new account (see Manage Company Users) or contact the CRRC at [email protected].
- You may also change your password here, or leave it blank if you do not want to make changes.
- Click on “Update Account.” You will see a green bar letting you know that your changes have been saved.
Manage Company Users
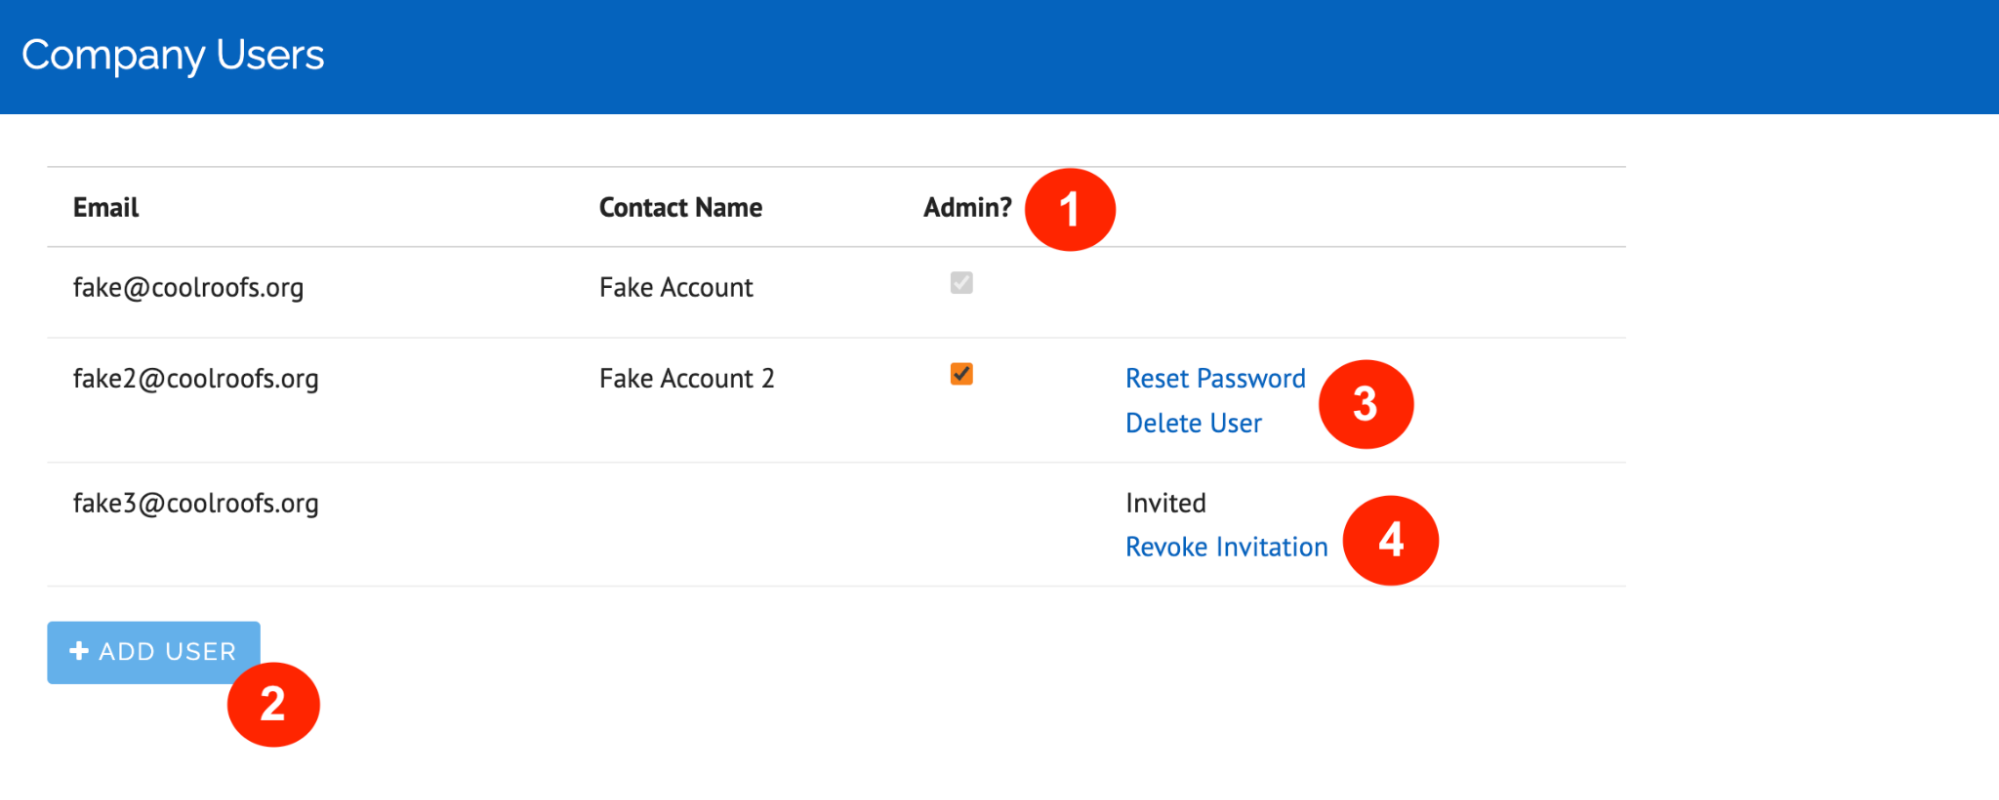
Only administrators can manage company users. All user accounts in a company have access to all product information submitted by anyone in the company.
- Add a new company user by navigating to “Accounts” in the top menu and click on “+ Add User.” You will need to provide the email address where they can receive an account invitation. This email address will become their login.
- Select which users have administrative rights.
- At any time, you can help a user reset their password by clicking on “Reset Password” or delete users who should no longer have access.
- You may also revoke a previously sent invitation if you have made a mistake.
Company Status
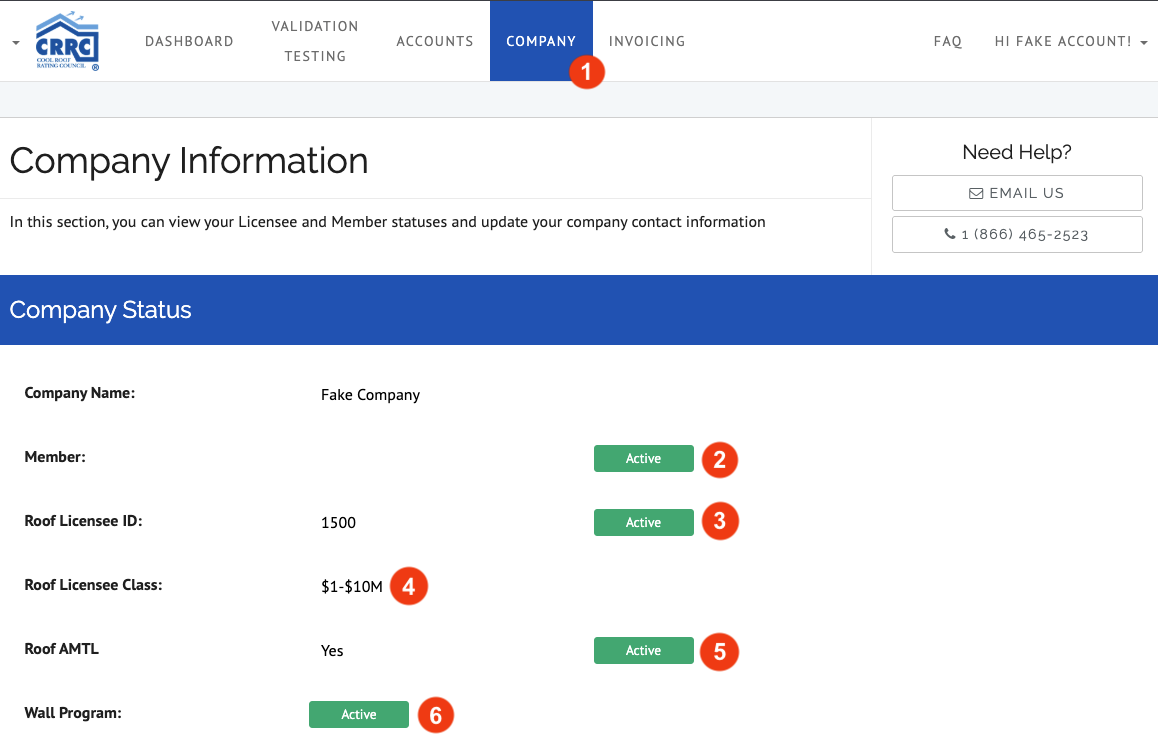
Only CRRC staff can manage company status as a CRRC Member,Roof or Wall Licensee. To view your company status:
- Navigate to “Company” in the top menu.
- Current members will be shown as “Active.” If you wish to become a member, please contact us at [email protected].
- Licensee status is considered “Active” if the account has paid annual dues. Failing to pay dues through the Invoicing page may result in deactivation of Licensee status.
- The Licensee Class Tier is based on your Annual Roofing Product Sales and is self-reported in your Licensee application. CRRC periodically requests this information to ensure you are still in the correct category. Your Annual Renewal Licensee fee is based on this category.
- If your company is an Approved Manufacturer Testing Laboratory (AMTL) for the Roof or Wall Program, the status will be shown as “Active.” Wall Program AMTLs may submit initial test data for Wall Program Color Family Additional Element applications.
- From the Roof Portal, the Wall Program status is displayed. Likewise, from the Wall Portal, your Roof Program status is displayed. “Not Applicable” will be displayed if you do not participate in the other rating program.
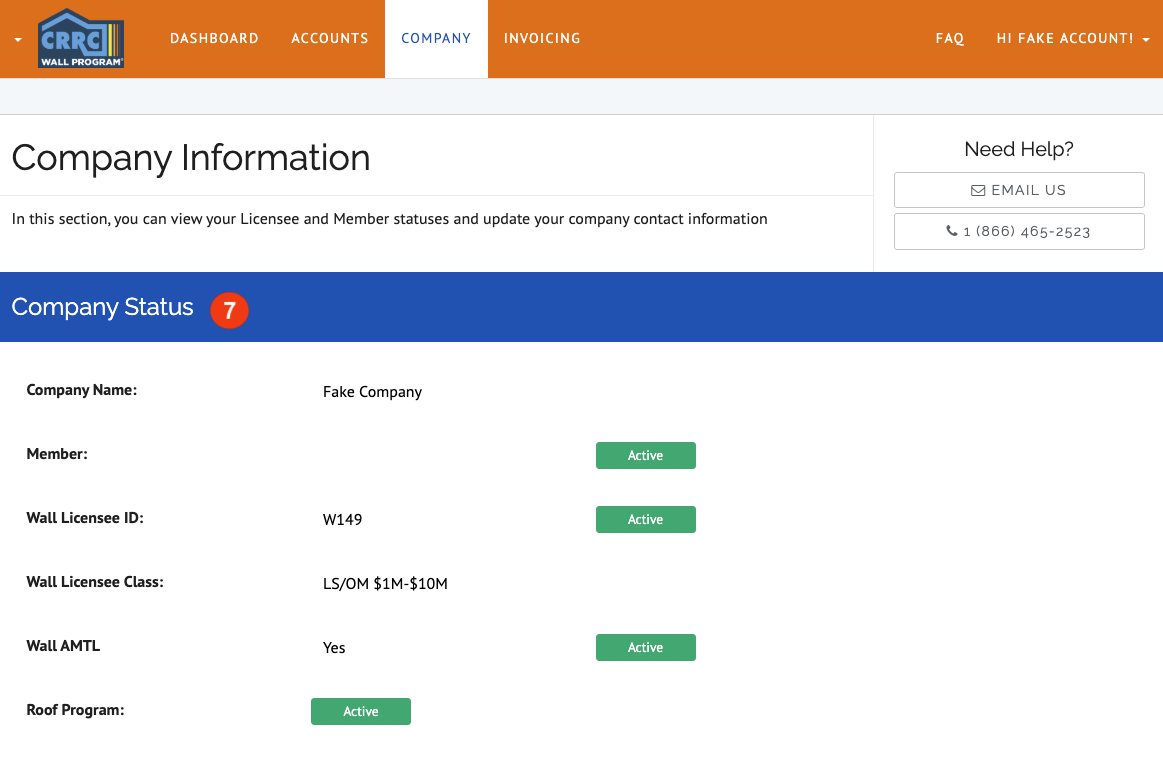
- The Company Status section on the Wall Portal contains the same company status information as the Roof Portal, but for the Wall Program.
Manage Company Contacts & Locations
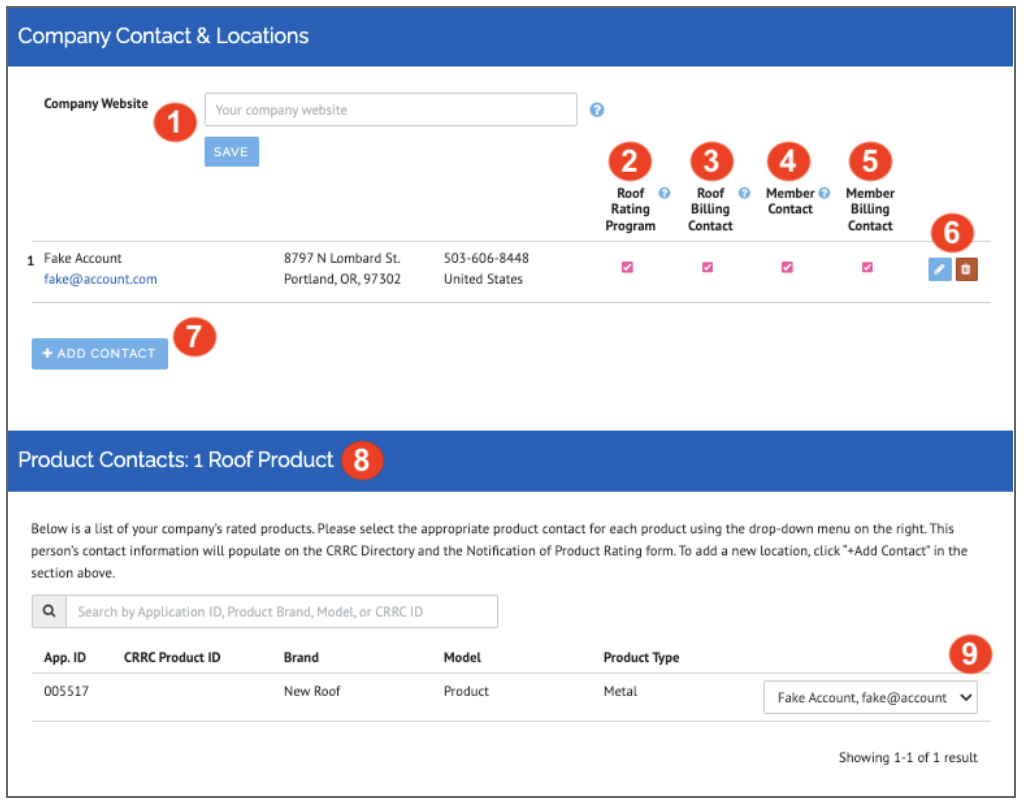
Administrators can manage company information, such as:
- Company Website: The company website URL listed in this field appears under the Manufacturer Contact information on the CRRC Rated Products Directory
- Roof Rating Program Contact: This person will receive communications related to changes to CRRC Roof Program requirements
- Roof Billing Contact: This person will receive notices when payments are due and follow-up communication by CRRC staff regarding invoices and payments for the Roof Program
- Member Contact: This person will receive communications related to CRRC Membership, such as notices for the CRRC Annual General Membership Meeting (AGM) and voting in the CRRC’s annual Board elections
- Member Billing Contact: This person will receive notices when payments are due and follow-up communication by CRRC staff regarding invoices and payments for the CRRC Membership
- Edit Contact: Edit an existing contact with the pencil icon, or delete it with the trashcan icon
- Add Contact: Add a new contact by clicking on “+ Add Contact”
- Roof Product Contacts: The Roof Product Contact for each application is selected during the submission of the CRRC Roof Program Product Rating Application. Roof Product Contacts can only be edited through the Roof Portal
- Edit the product contact for Roof Program product ratings by using the dropdown arrow next to the product contact for each product rating
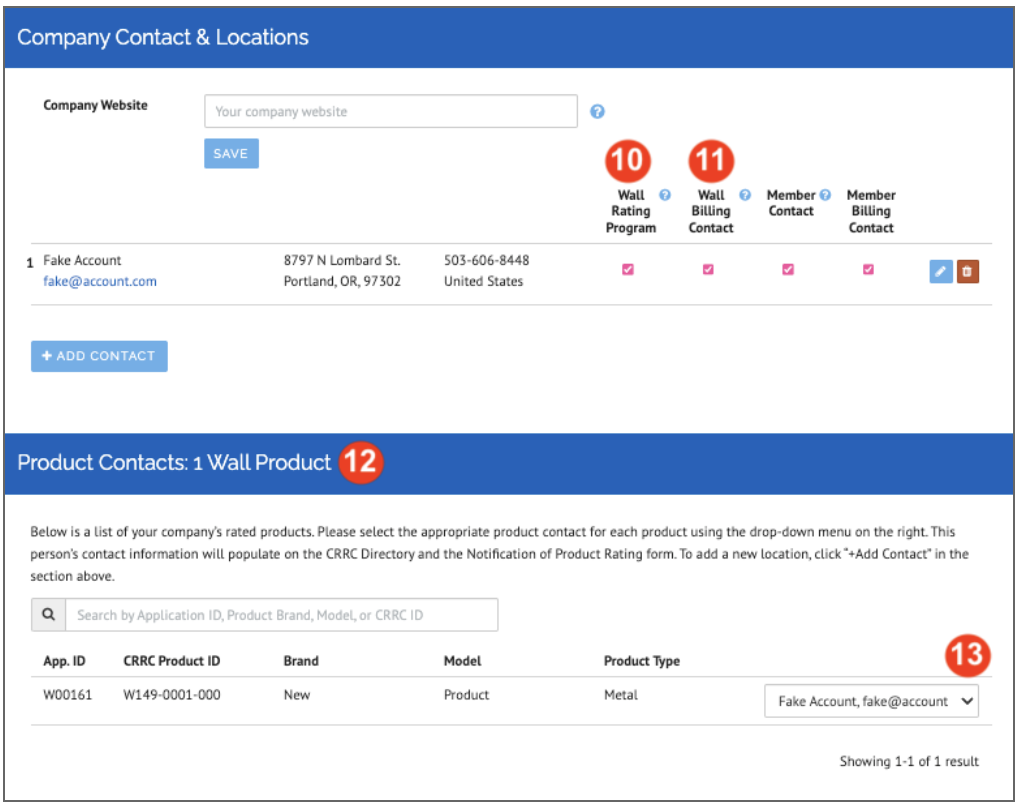
- Wall Rating Program Contact: This person will receive communications related to changes to CRRC Wall Program requirements
- Wall Billing Contact: This person will receive notices when payments are due and follow-up communication by CRRC staff regarding invoices and payments for the Wall Program
- Wall Product Contacts: The Wall Product Contact for each application is selected during the submission of the CRRC Wall Program Product Rating Application
- Edit the product contact for Wall Program product ratings by using the dropdown arrow next to the product contact for each product rating. Wall Product Contacts can only be edited through the Wall Portal.
New and Existing Applications
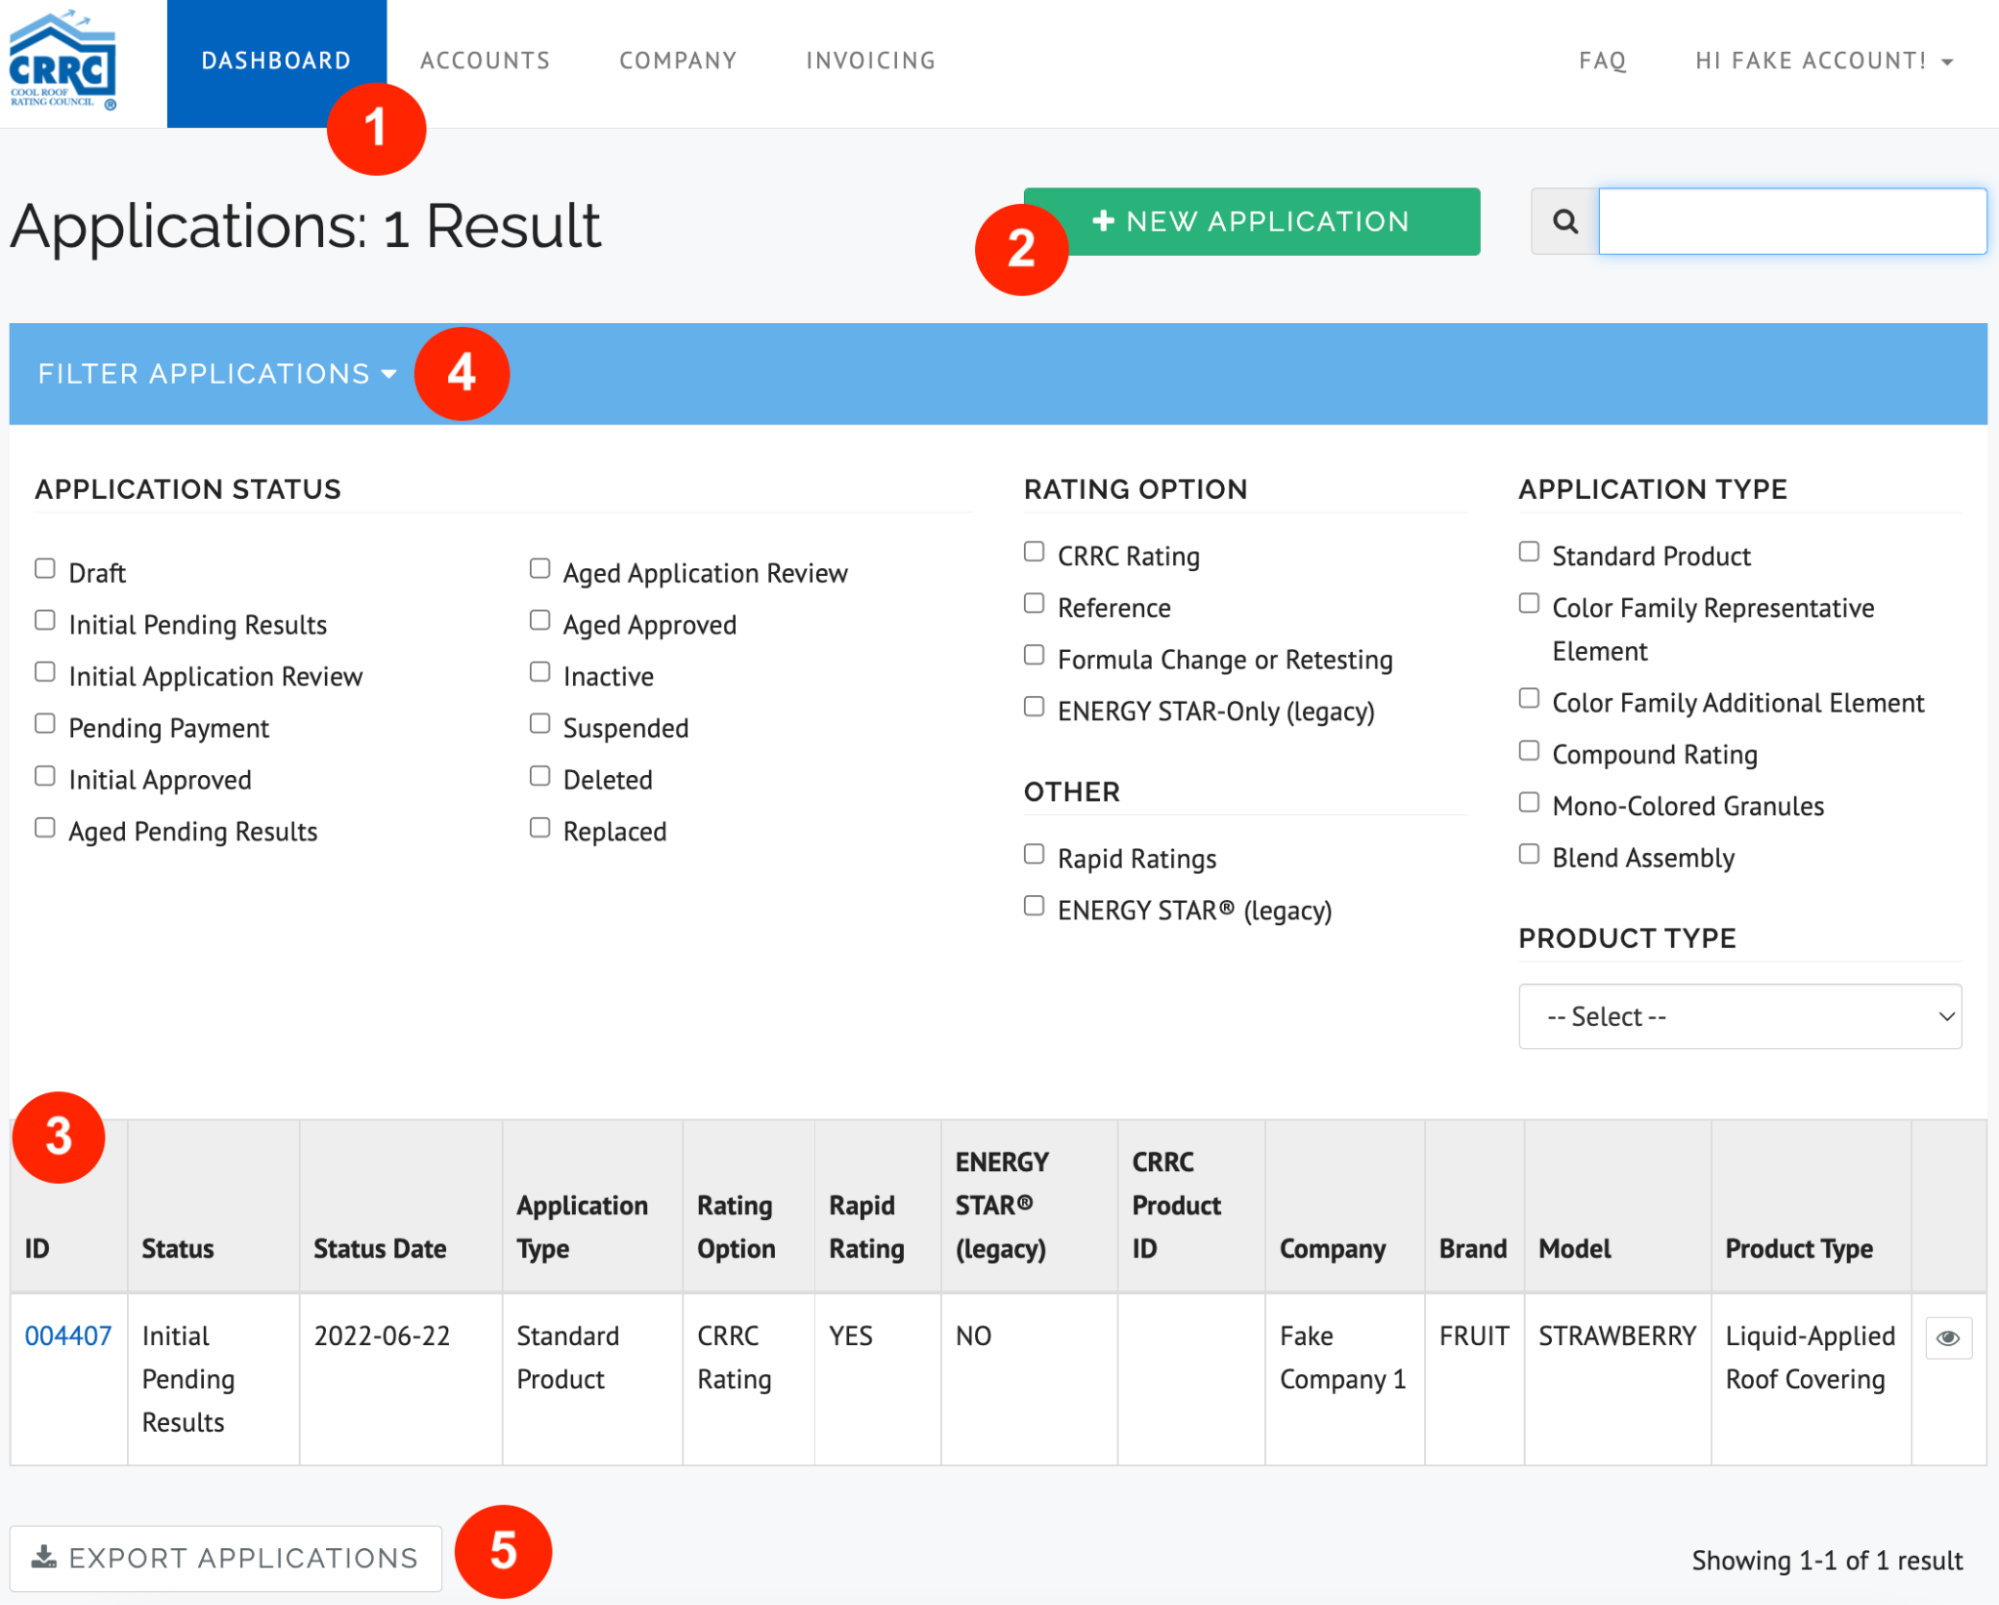
You can access your existing applications or create new ones from the Roof and Wall Portal Dashboards.
- Navigate to the ”Dashboard” from the top menu.
- Click on the green “+ New Application” button to begin a new product rating application.
- Existing applications in your company are listed in the dashboard and can be accessed by clicking on the blue Application ID, or the pencil icon, which looks like an eye when the application is in a read-only status.
- The dashboard can be filtered using the filtering options.
- You can also export a complete list of all of your product applications by clicking on “Export Applications” at the bottom left.
- The Wall Product Rating Dashboard is where you submit Wall Product Rating Applications and manage your existing Wall Ratings. The Dashboard is the same for the Roof and Wall Rating Programs, with the exception of a few filter options (there are no Rapid Ratings, Momo-Colored Granules, or Blend Assembly applications in the Wall Program).
Submitting an Application
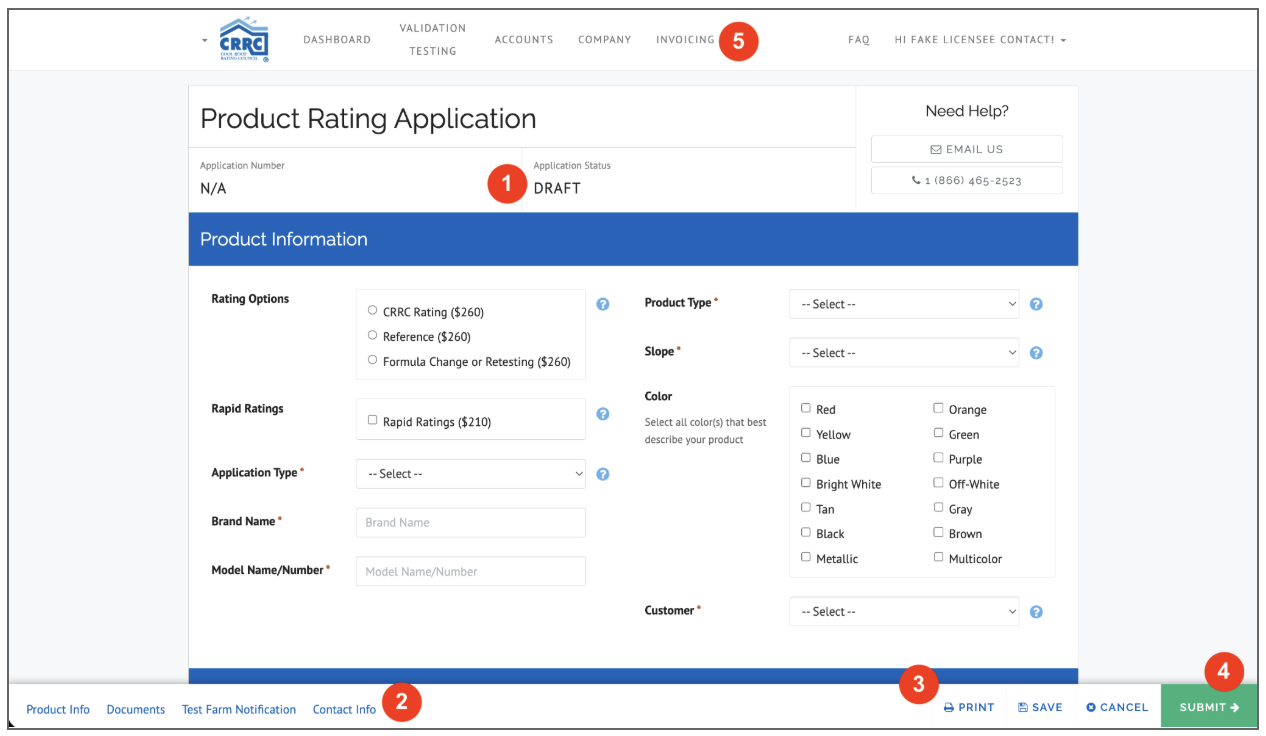
- A new product rating application will start in a “Draft” status. All fields marked with a red asterisk (*) are required. Click on the blue ? icon to display helpful information about the field.
- Keep scrolling and provide answers to all four sections of the application: Product Information, Documents, Test Farm Notification, and Contact Information.
- You can Print your application, Save the application at any time before you are ready to submit and come back to it later, or Cancel your changes without saving.
- When you are ready, click the green “Submit” button on the bottom-right. You will be asked to provide your name and account password as your signature in order to submit the application.
- The Product Rating Application will not be approved until the initial application fee is paid through the Invoicing page.
Wall AMTL Color Family Additional Element Applications
Wall Approved Manufacturing Testing Laboratories (AMTL) may submit Initial Test Data for Color Family Additional Element (CFAE) applications.
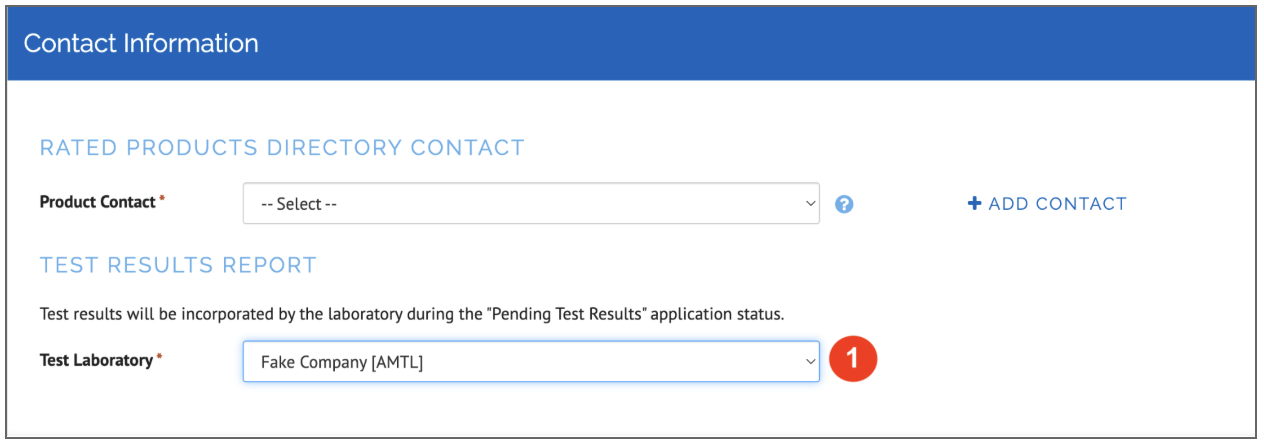
- When CFAE is selected as the Application Type, the AMTL will be able to select themselves as the Test Lab in the Contact Information section for that application.
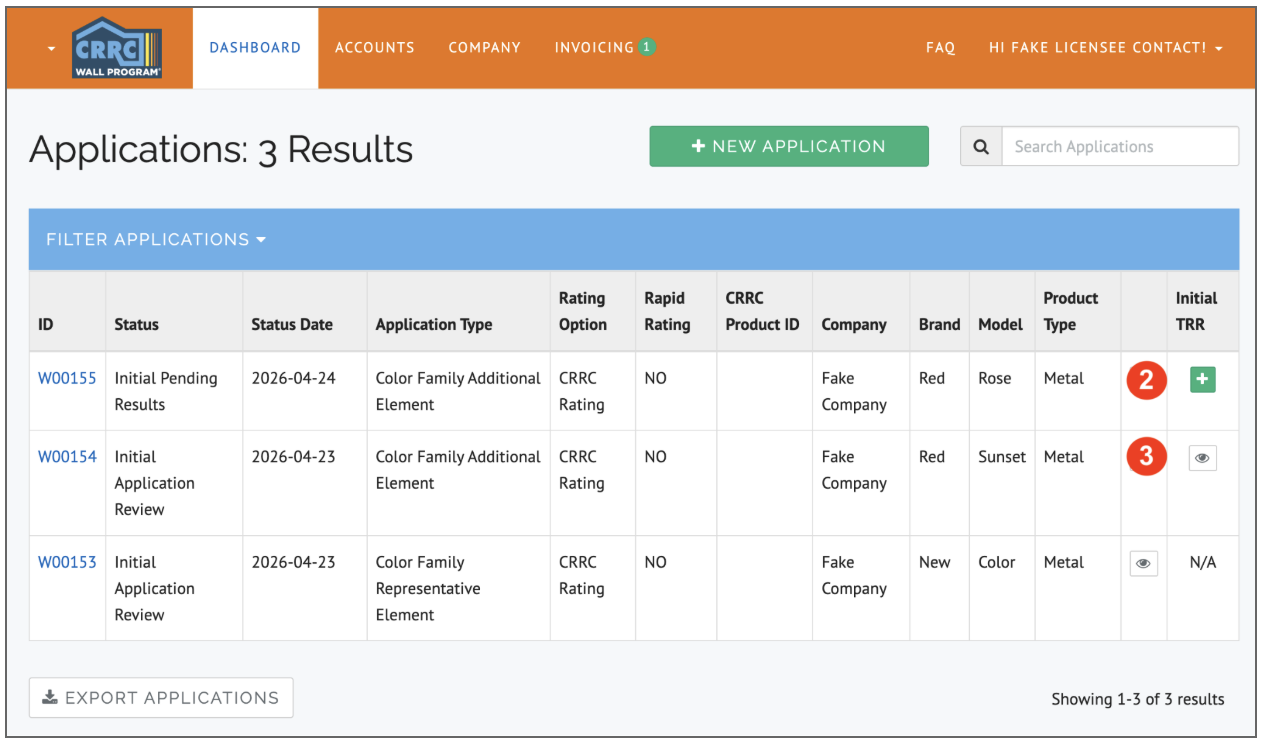
- Once the application is submitted, the Initial TRR column will have a green plus sign next to the CFAE application. Click on the green plus sign and enter and submit the Initial Test Data for the CFAE application.
- When the Initial Test Data is submitted, the green plus sign icon will turn into an eye icon, where you can access the submitted data.
Creating an Invoice
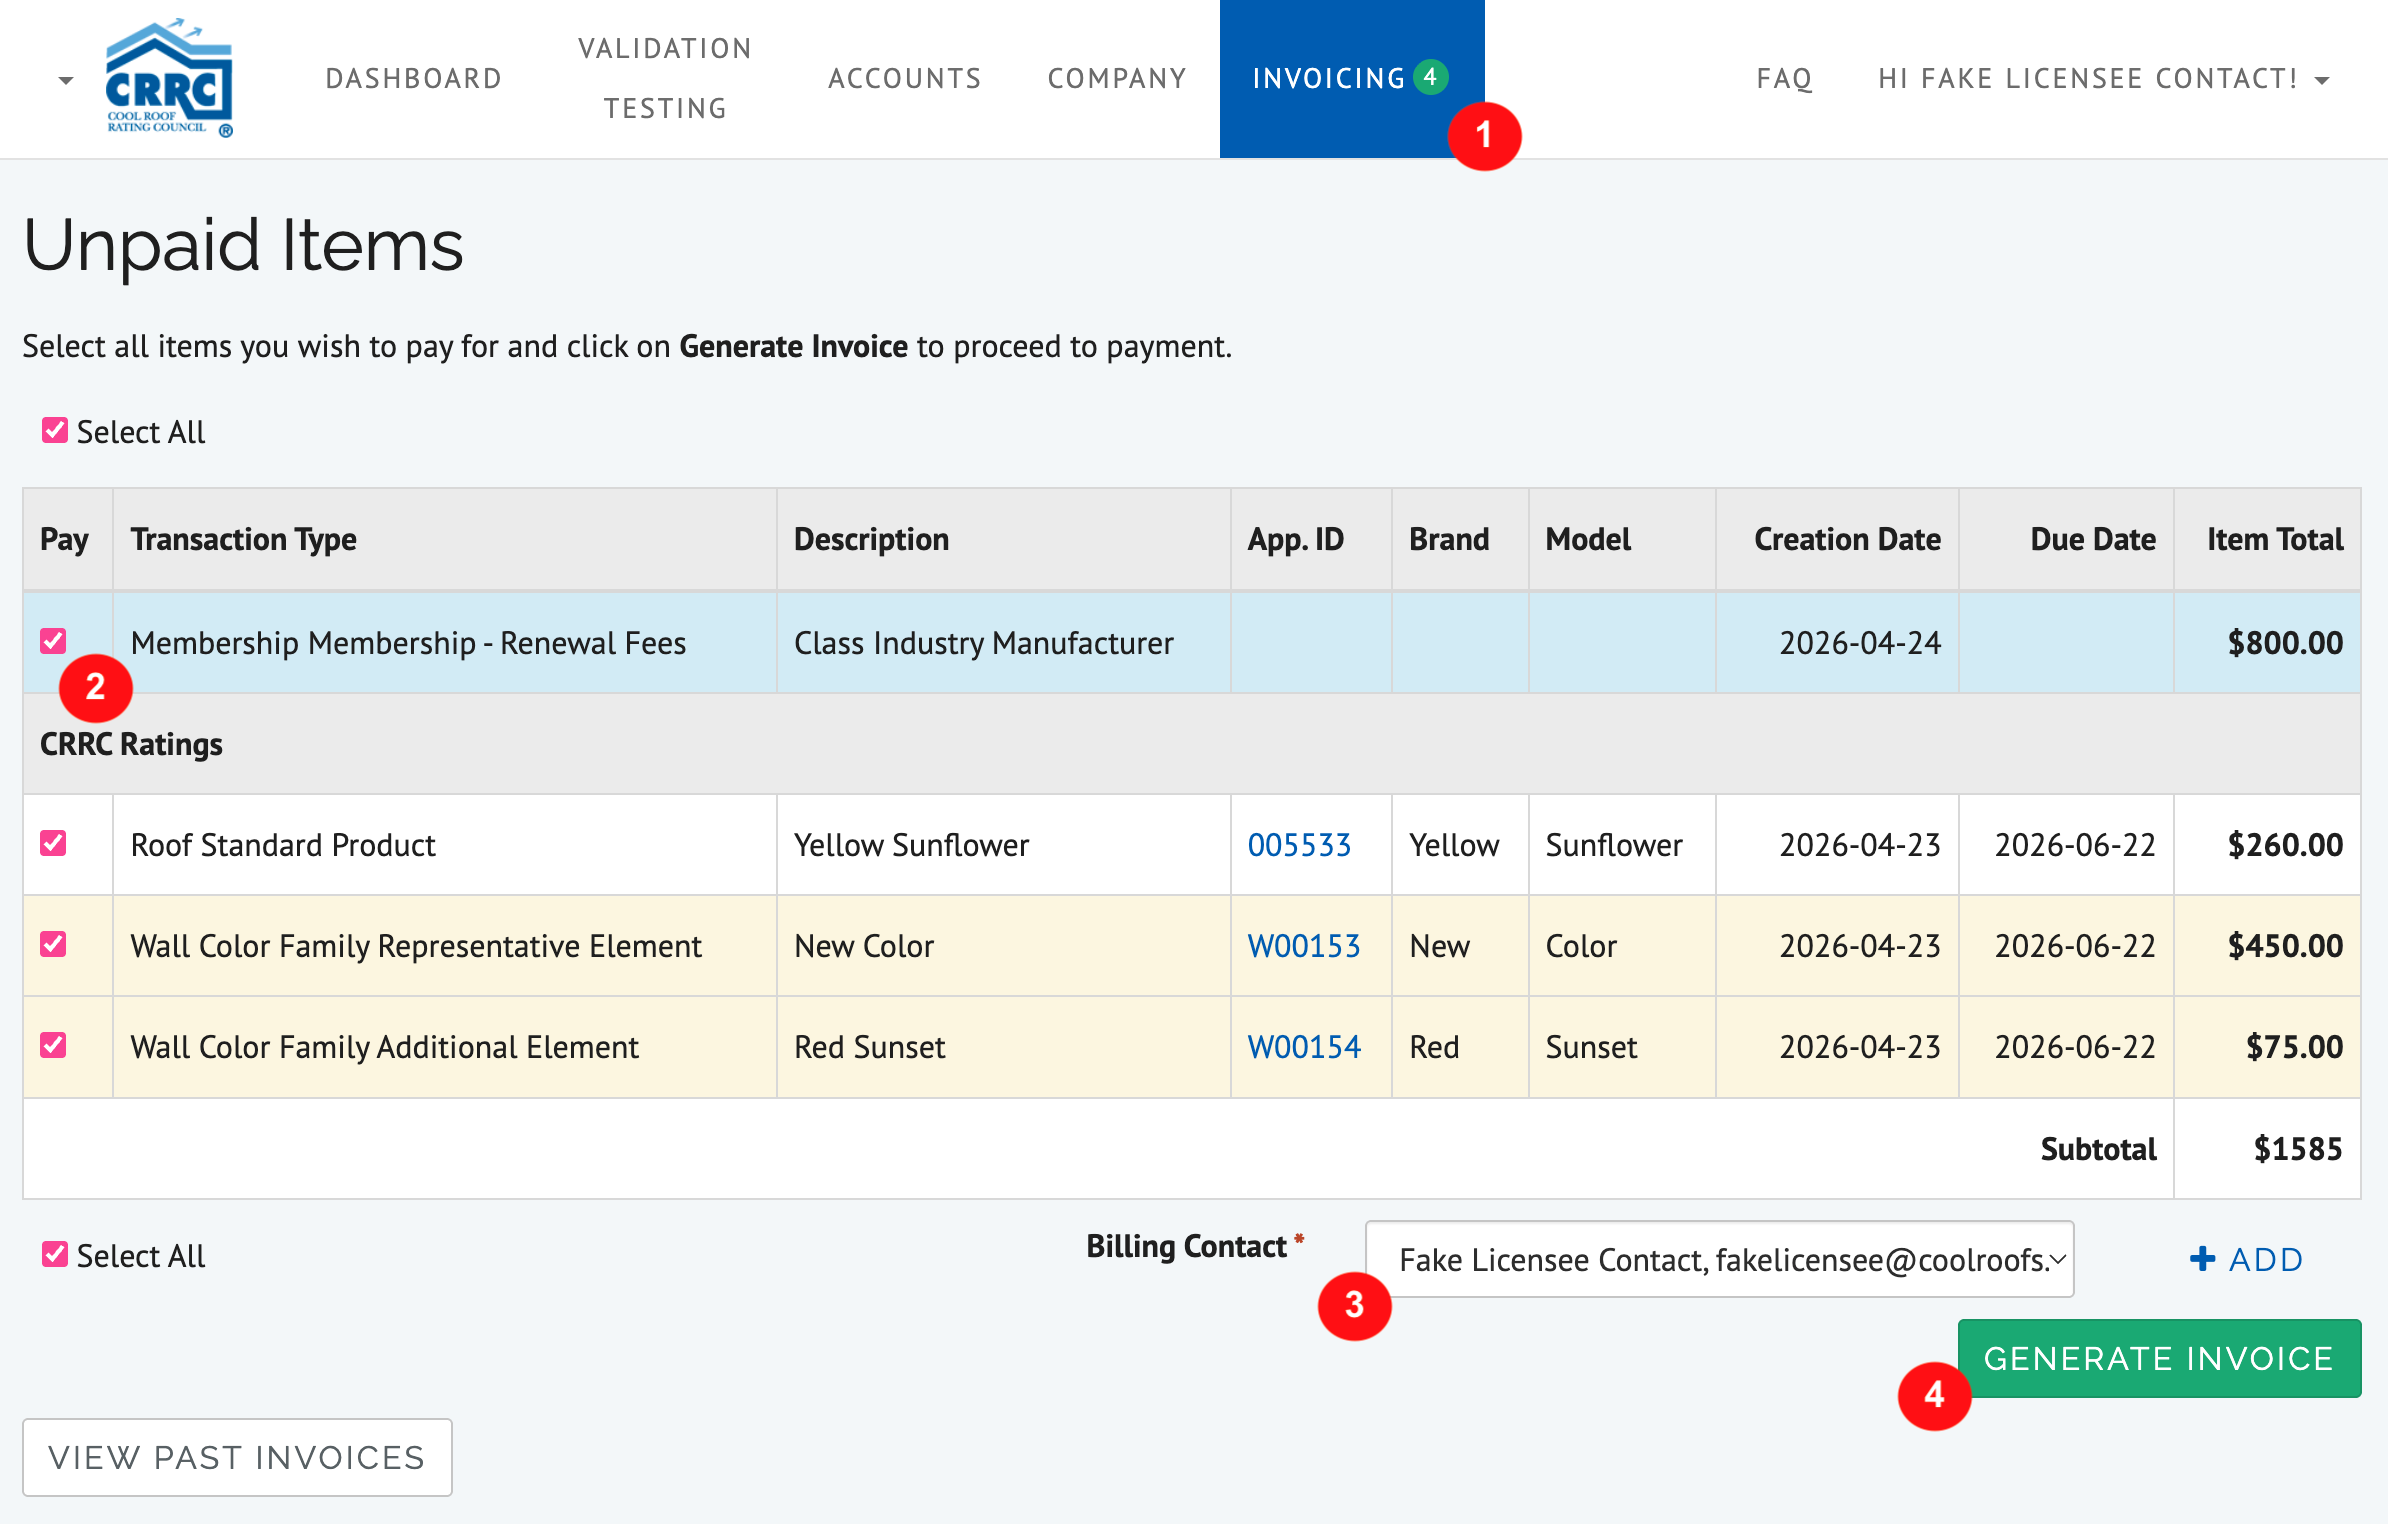
The Invoicing page allows you to create invoices for the unpaid invoice items you wish to pay for. Invoice items for all programs (Roof, Wall, Member Programs) are located in the Invoicing section for each program. You can generate and pay your invoice from either the Roof or Wall Rating Portal, if you participate in both programs.
- Navigate to “Invoicing” from the top menu. The green number indicates how many unpaid items your company has generated.
- Select the unpaid items you wish to include in an invoice (like adding items to your cart). You can create separate invoices for each program.
- Select a Billing Contact from the dropdown window.
- Click the green CHECKOUT button. See Paying an Invoice section for payment instructions.
- All unpaid invoices are listed below the unpaid items.
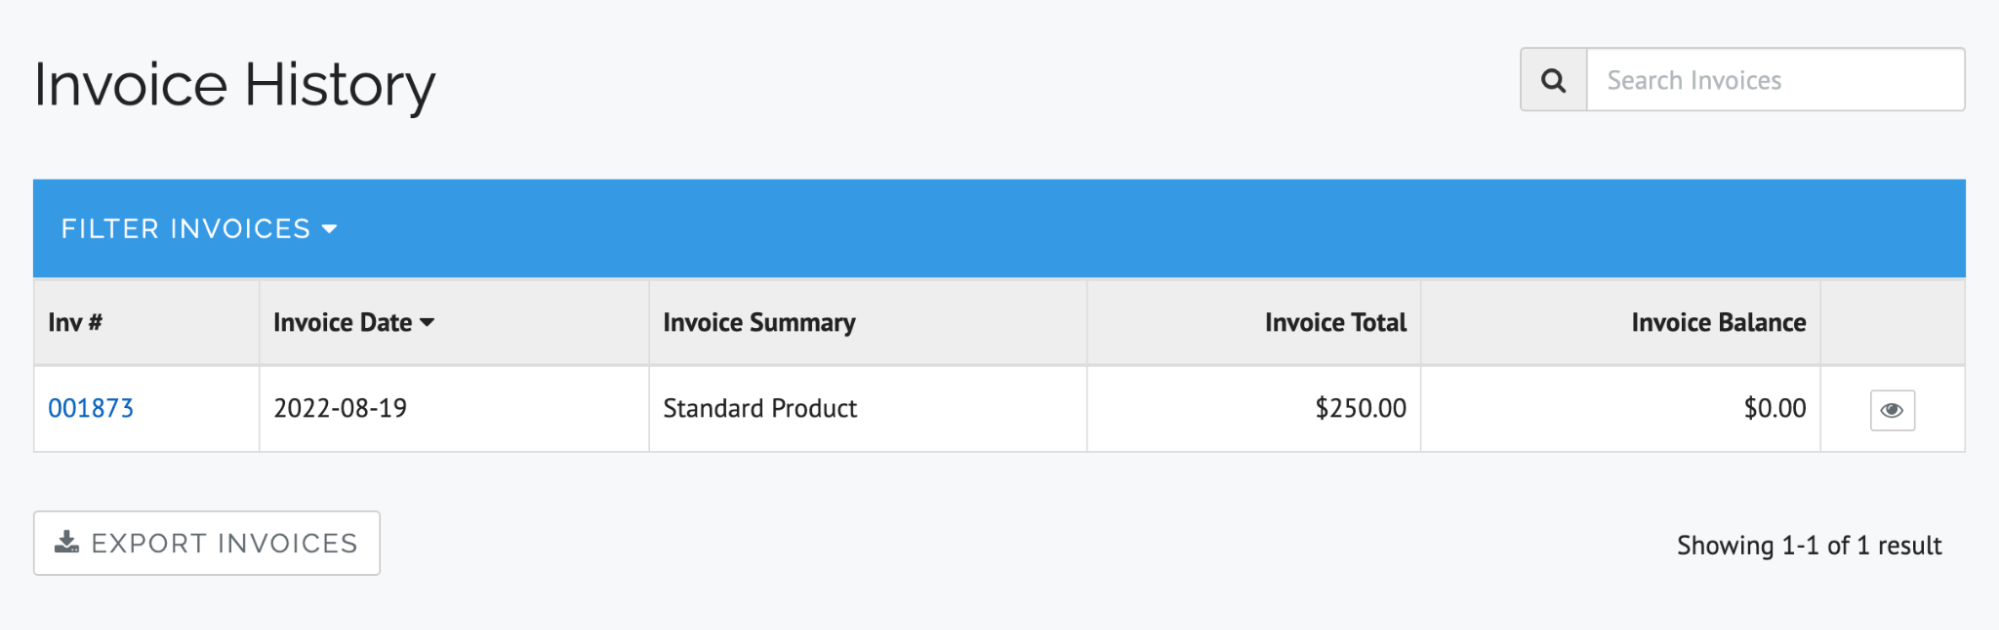
- You can view past invoices by clicking the “View Past Invoices” button.
Paying an Invoice
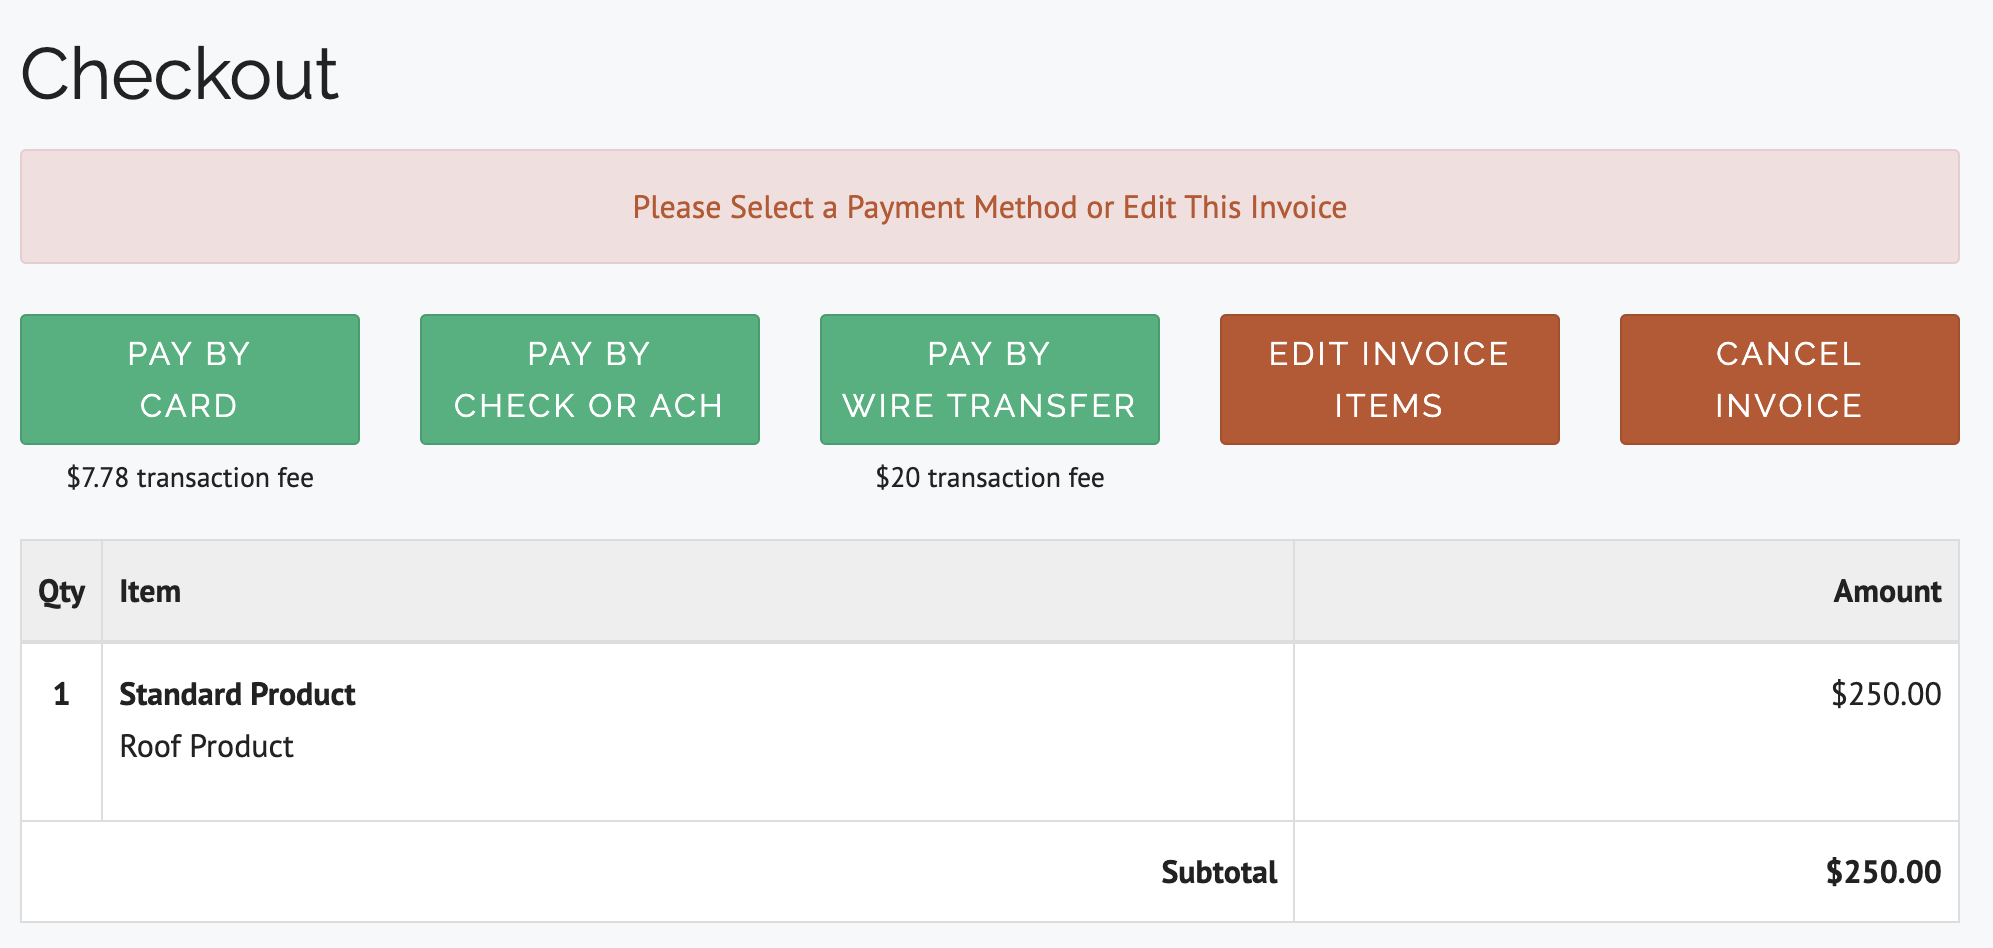
- After selecting the green GENERATE INVOICE button, click on the green button with your preferred payment method. You have a choice to pay by card online, check, ACH, or wire transfer.
- Note that credit card and wire transfer payments have an additional transaction fee.
- You can edit or cancel an invoice if you have made a mistake using the red buttons to the right of the green payment buttons, and the items will go back to your list of Unpaid Items.
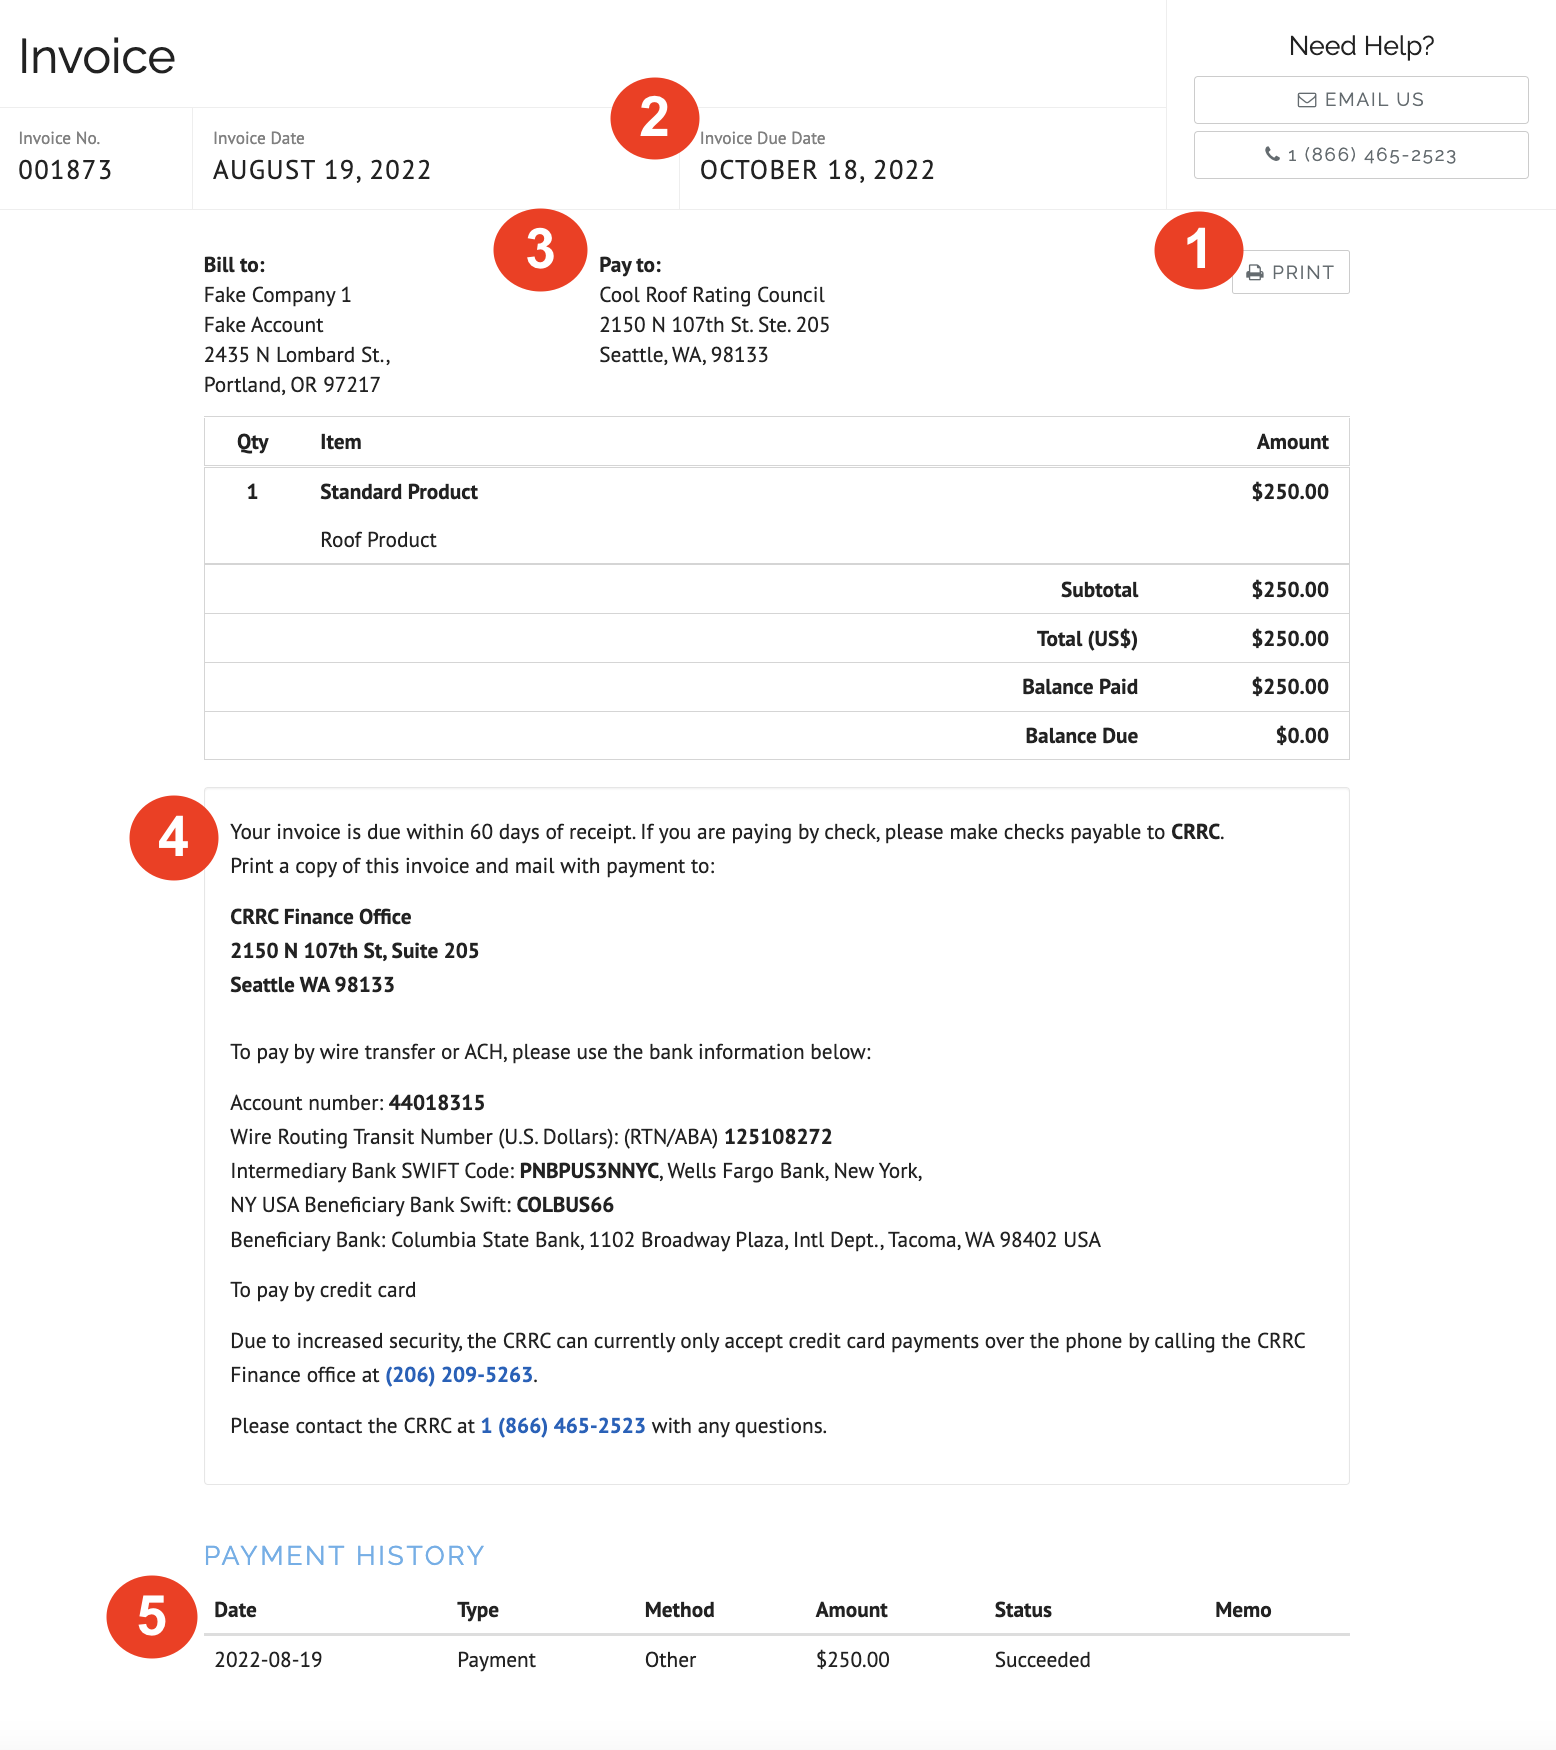
- Use the PRINT button to print (or export as a PDF) a copy of the invoice.
- Payment is due within 60 days, with the exception of CRRC Annual Renewal invoices, which are always due on a fixed day. The invoice will not be considered paid until the payment is received by CRRC.
- Checks should be sent to the address on the invoice.
- Use the bank information provided for ACH payments and domestic wire transfers.

- Once your payment is received, it will be reflected in the Payment History section.
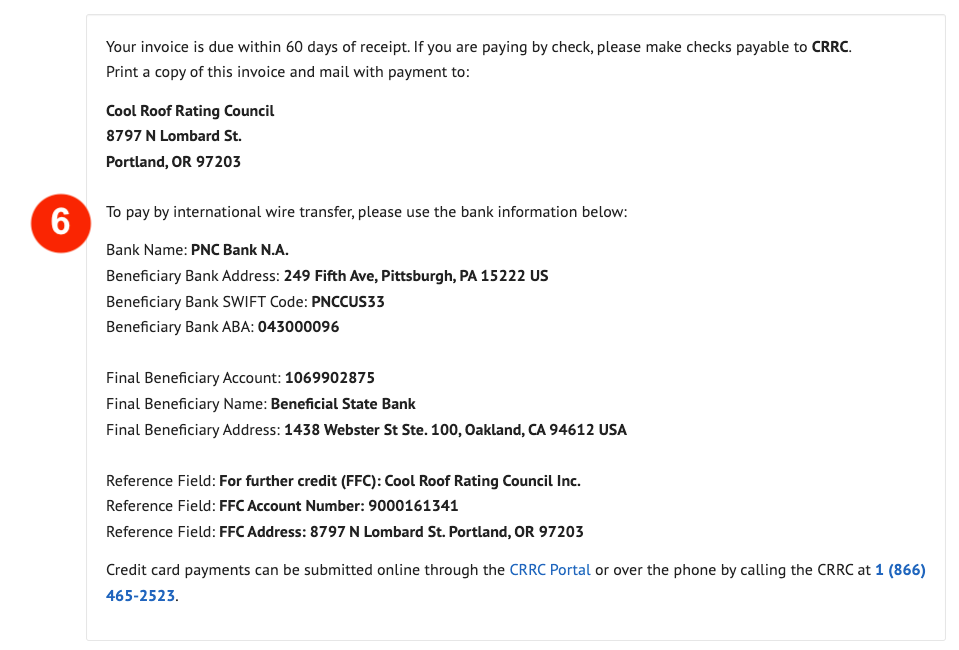
- When “Wire Transfer” is selected as the payment option, international wire transfer bank information is provided. Please note that wire transfer bank information is different from the domestic wire transfer and ACH payment information.
Application Status Flow
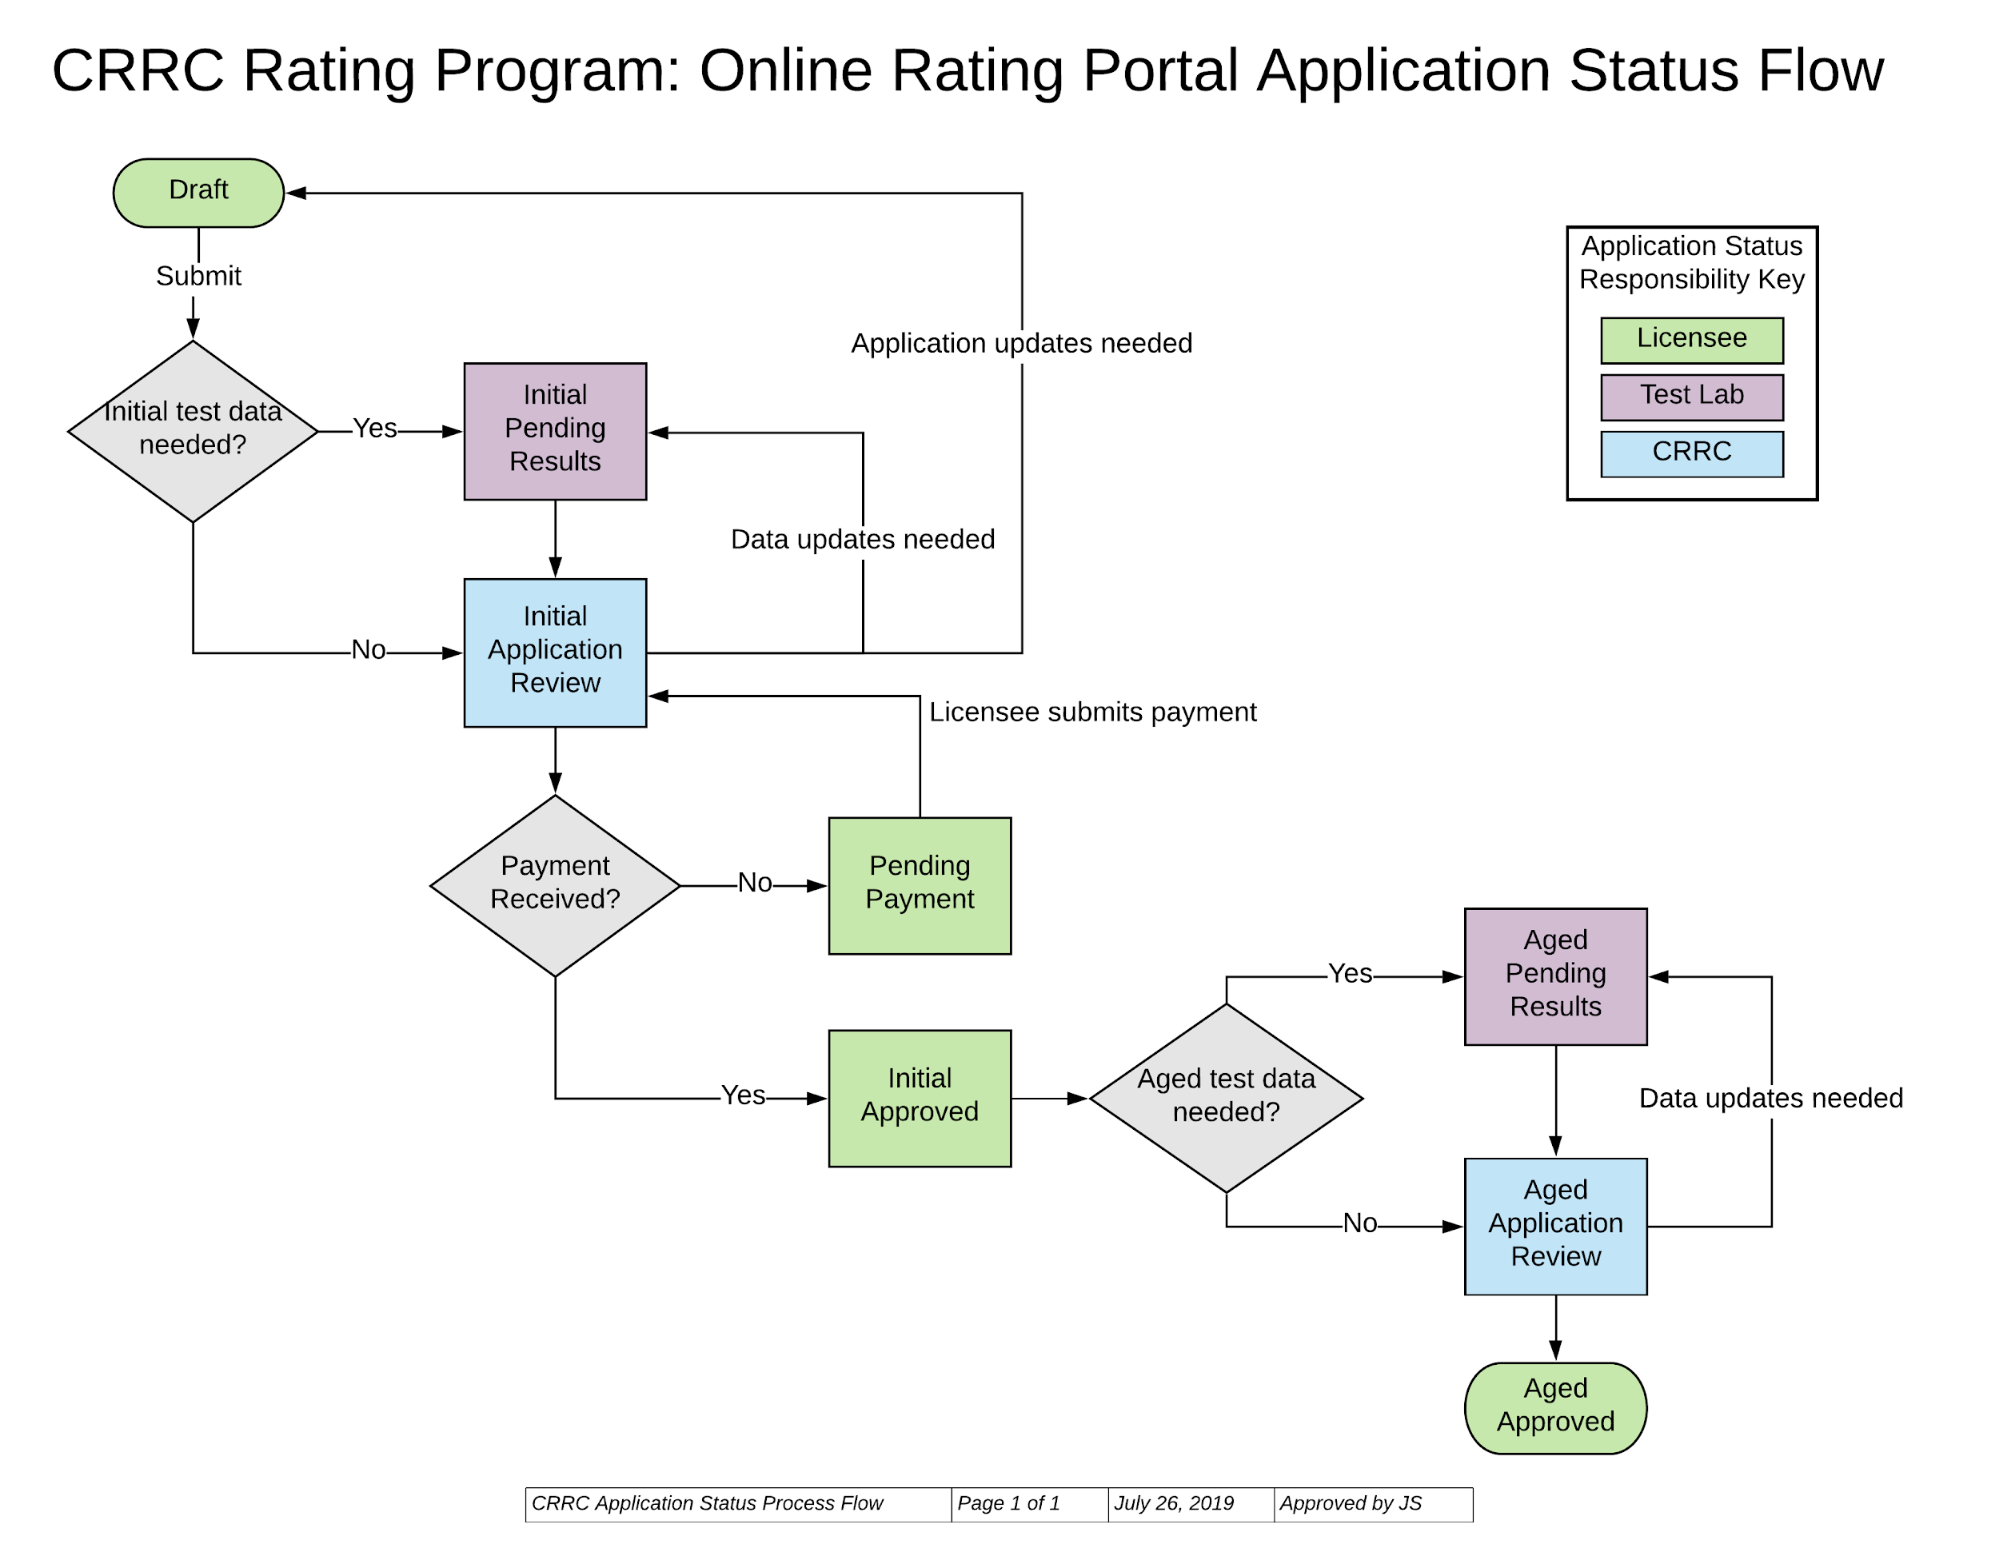
This diagram represents the status flow of applications as they move from the initial draft status, through the various test results, and finally end at Aged Approved after the three-year aging process.
A green status is where the Licensee has primary responsibility to provide information, purple is when Laboratories are required to submit test data, and blue indicates CRRC review statuses.
Validation Testing
With the adoption of the CRRC Validation Testing Program as CRRC’s Roof Program quality assurance mechanism, all decisions and actions related to Validation Testing are integrated into the Portal to streamline the process and make it easier for Licensees, Test Labs, and CRRC Staff to submit and view decisions and test data for Validation Testing.
Validation Testing Dashboard
With Validation Testing, all active product ratings must have a passing Validation Test every seven years to remain on the CRRC Rated Roof Products Directory. The Validation Testing Dashboard is the “hub” where products are assigned a Validation Testing year, which allows Licensees to plan seven years in advance for when their products are due to be validated.
Submit Decision
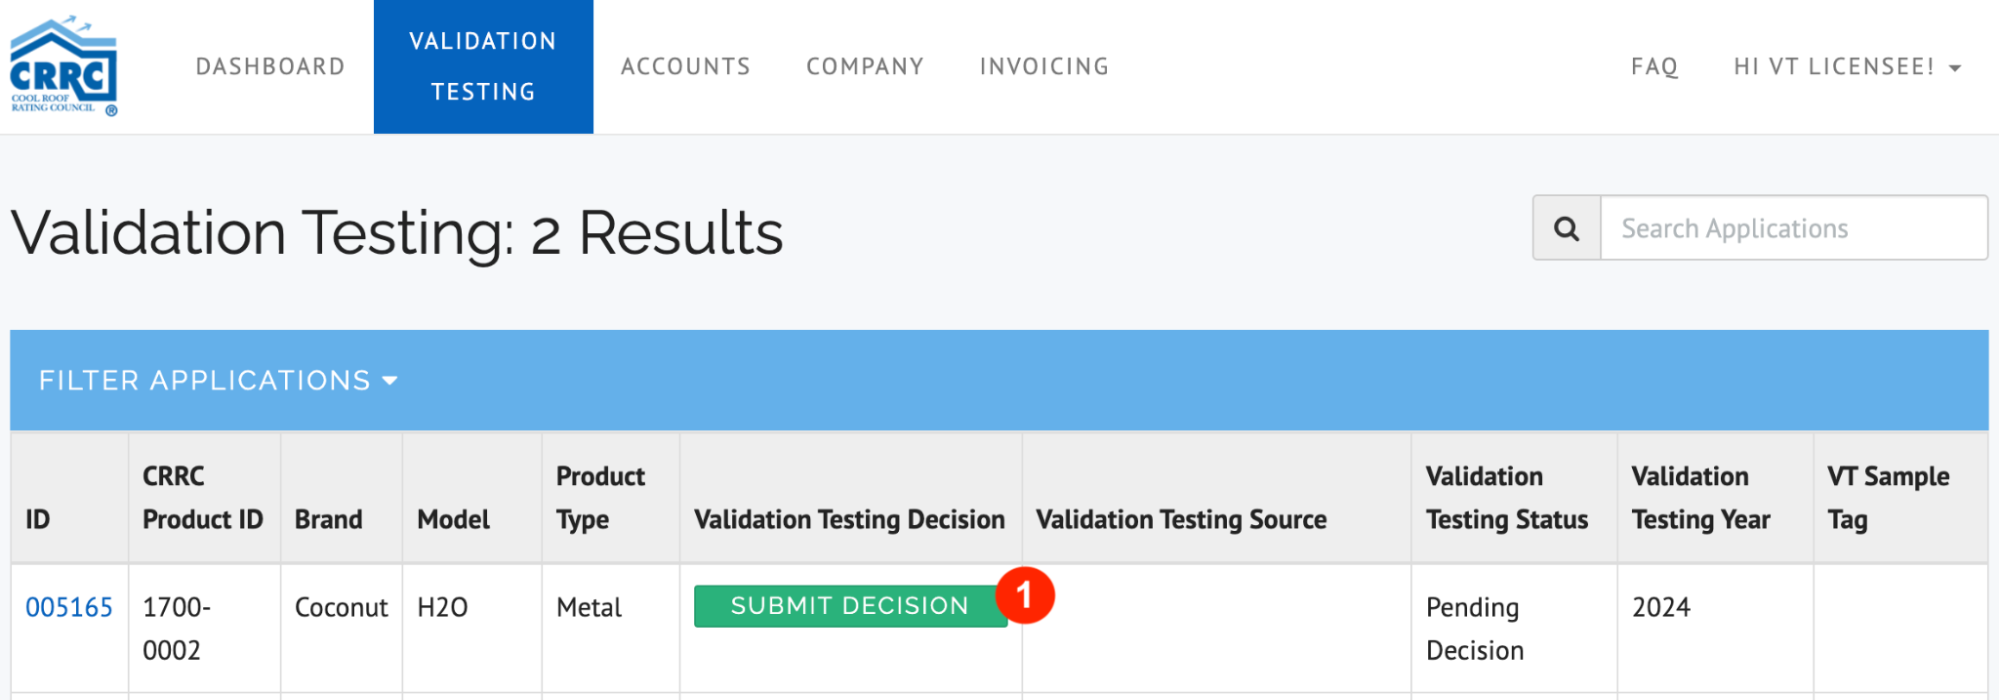
- Click the green “SUBMIT DECISION” button at the beginning of the Validation Testing year and select one of the following options:
- Proceed with Testing - The product will be made available for Validation Testing this year in order to remain active on the Directory.
- Retest - This product will be replaced by a new “Formula Change or Retesting” application that will proceed with testing and weathering. Proceed with the Product Rating procedure to rate the new product. When Initial Testing is approved, the previous formulation will be “Replaced” or will terminate automatically on December 31, whichever comes first.
- Voluntarily Terminate - The product will terminate automatically on December 31st and will not retain its CRRC rating.
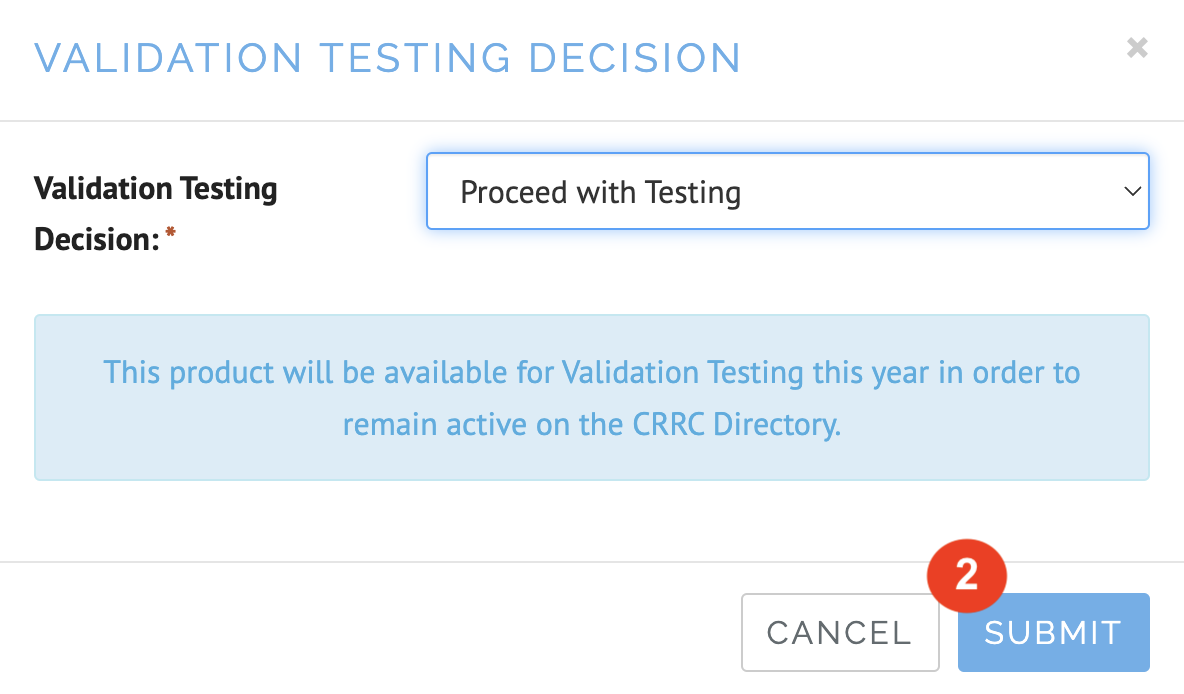
- Click the blue “SUBMIT” button to submit your decision.
Submit Production Source Information
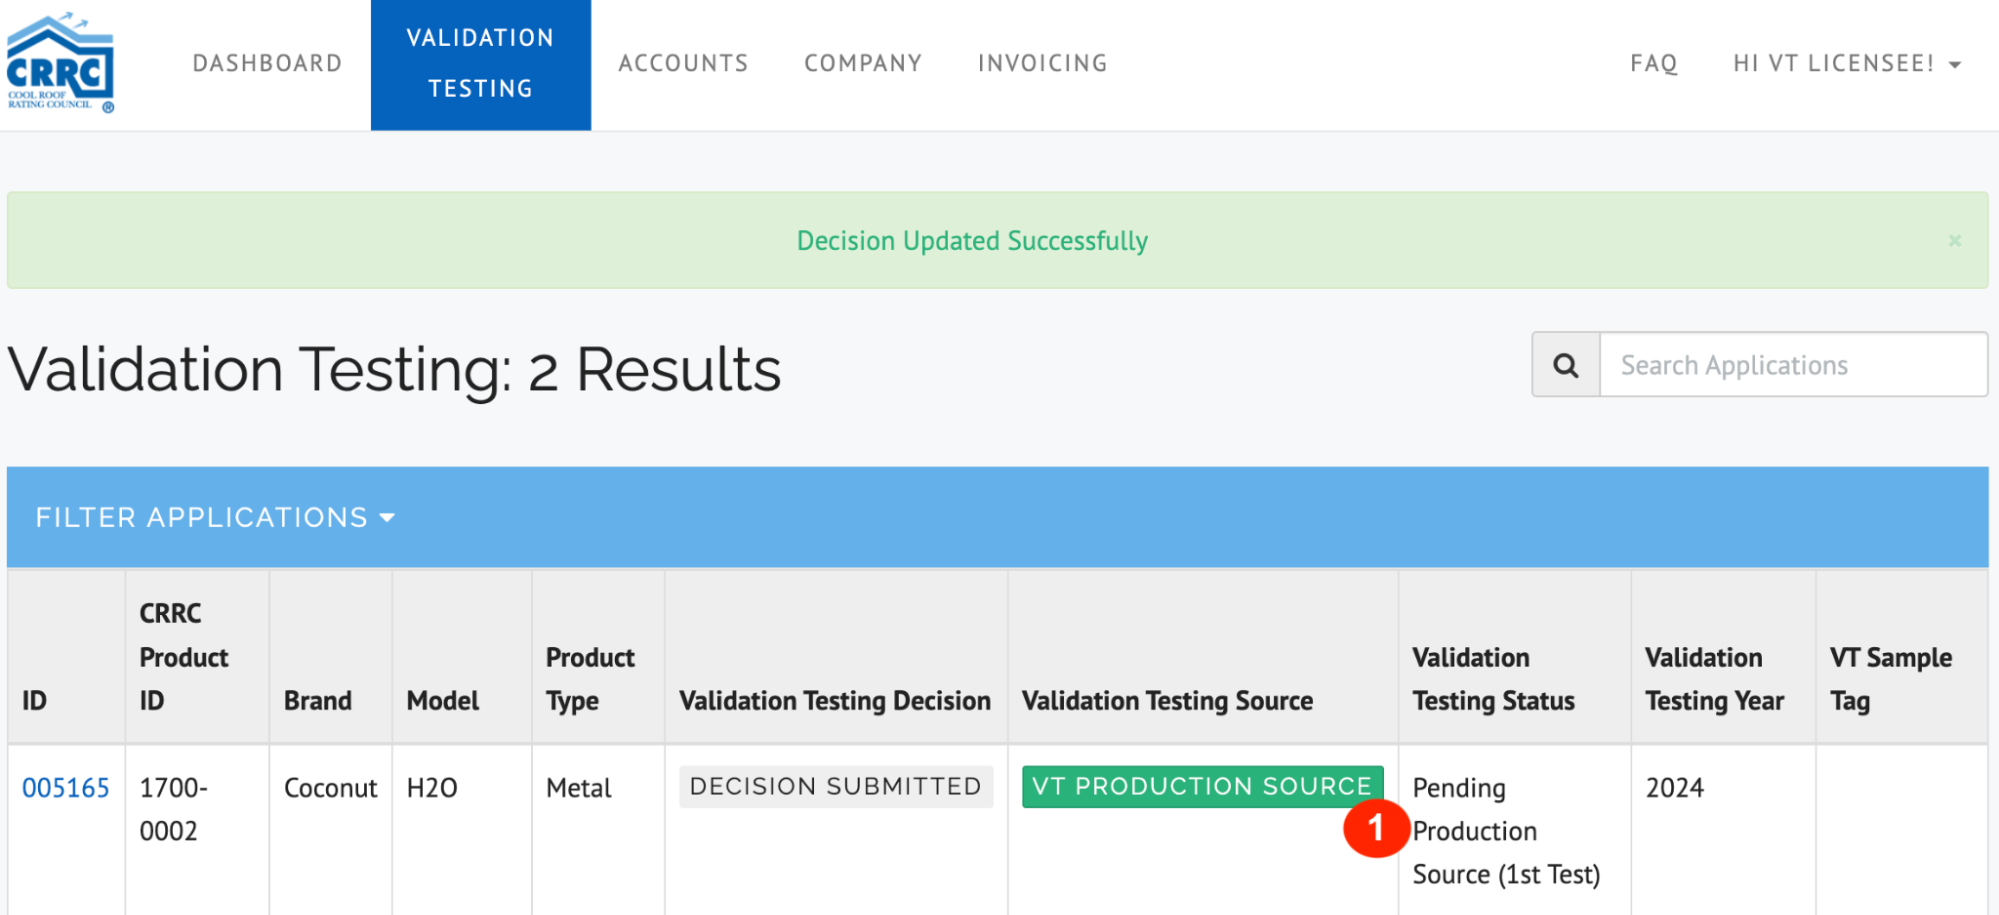
When you are ready to send your specimen(s) to a Test Lab for Validation Testing:
- Select the green “VT Production Source” button in the Validation Testing Dashboard.
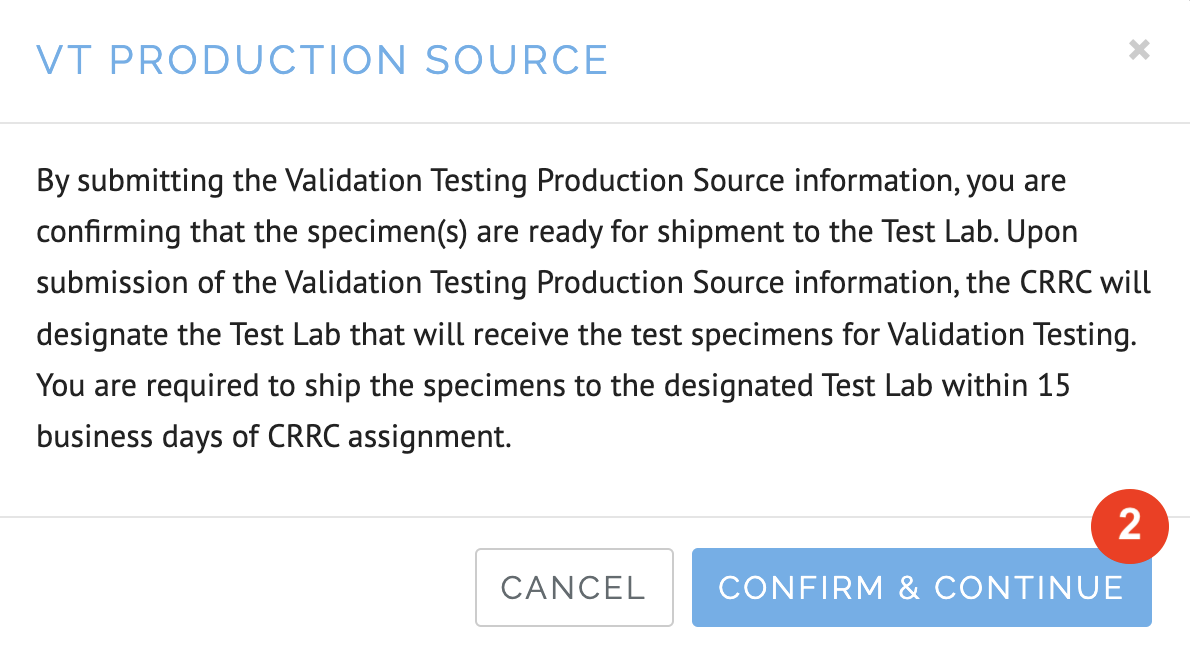
- Confirm that you are ready to ship your specimen(s) to the Test Lab, within 15 days of assignment.
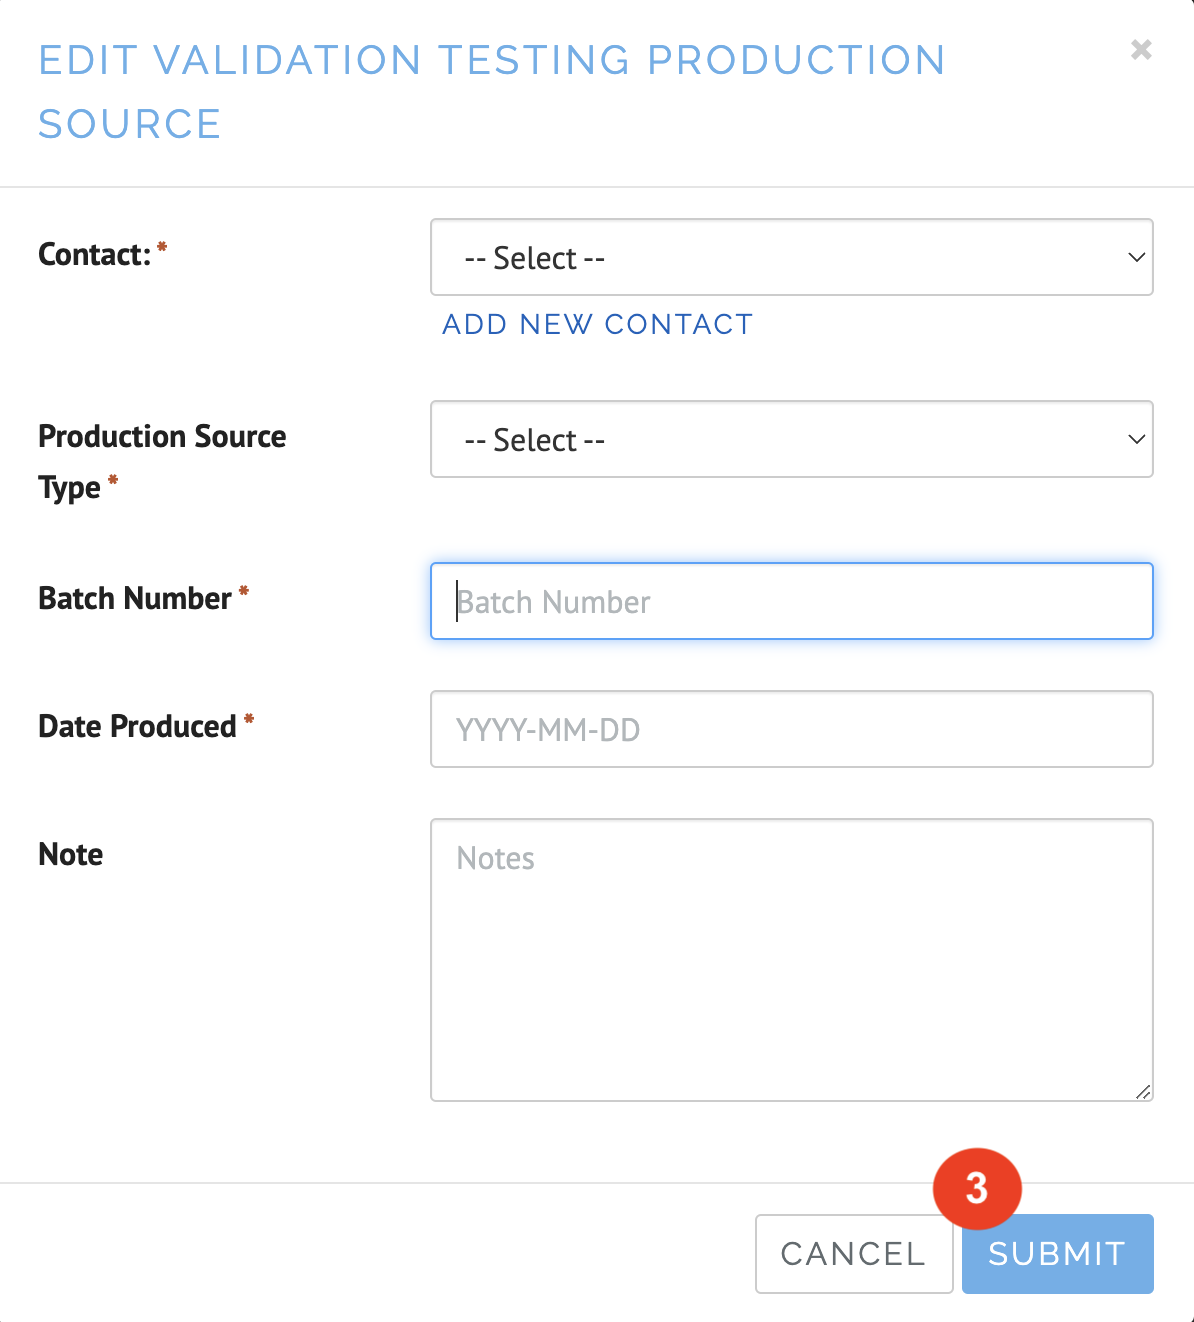
- Complete the required fields and click the blue “Submit” button. The required fields include:
- Contact - Select a Validation Testing Contact. This person will receive Portal email notifications regarding this Validation Test.
- Production Source Type - Describes the production method used to create the test specimen. Options are: Production Batch, Retain Specimen, Lab Batch, or Other.
- Batch Number*
- Date Produced
*If a second test is required, then the batch number must be different from the batch number submitted for the first Validation Test.
Wait for Test Lab Assignment


- When the VT Production Source is submitted, the Validation Testing Status is moved to “Pending Test Lab Assignment (1st Test)”. This lets CRRC Staff know to assign a Test Lab for Validation Testing.
- When CRRC Staff assigns a Test Lab, the Validation Testing Status will move to “Pending Results (1st Test)” and the Validation Testing Contact will receive an email notifying them of the Test Lab that has been assigned. The Test Lab must receive the specimen(s) within 15 days of Test Lab assignment.
Print Sample Tag
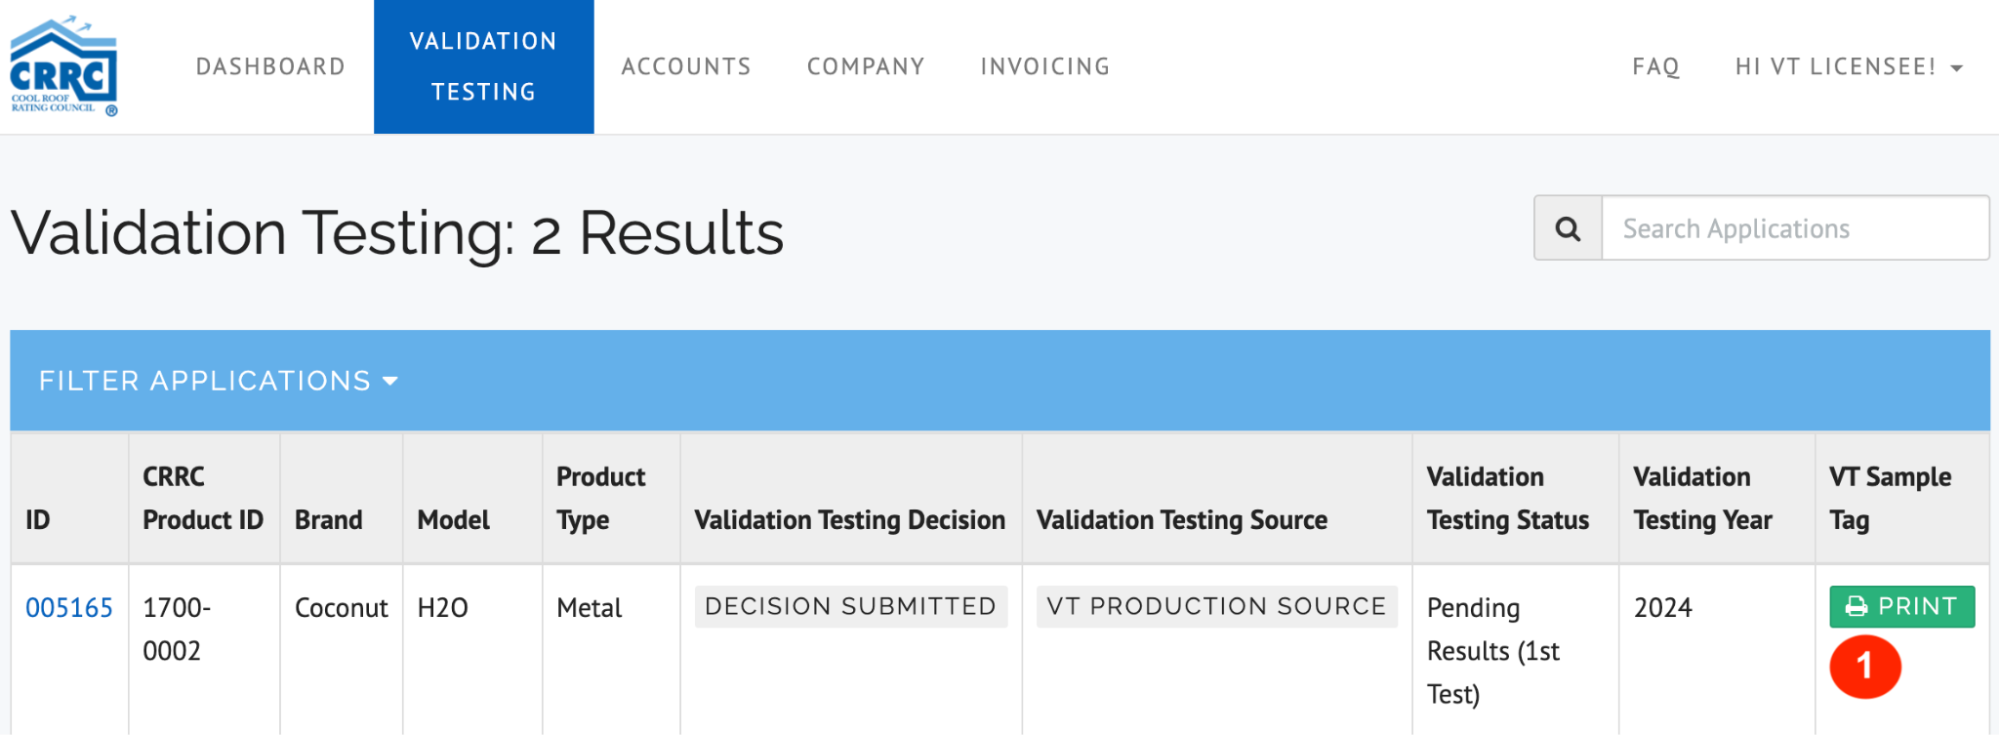
- Before shipping your specimen(s) to the Test Lab, print the Sample Tag and include it in the box with your specimen(s). To do so:
- Navigate to the Validation Testing Dashboard.
- Click the green “PRINT” button in the VT Sample Tag column.
- If you have more than one product proceeding with testing, a separate Sample Tag must be printed for each product and included with the specimen(s) sent to the Test Labs.
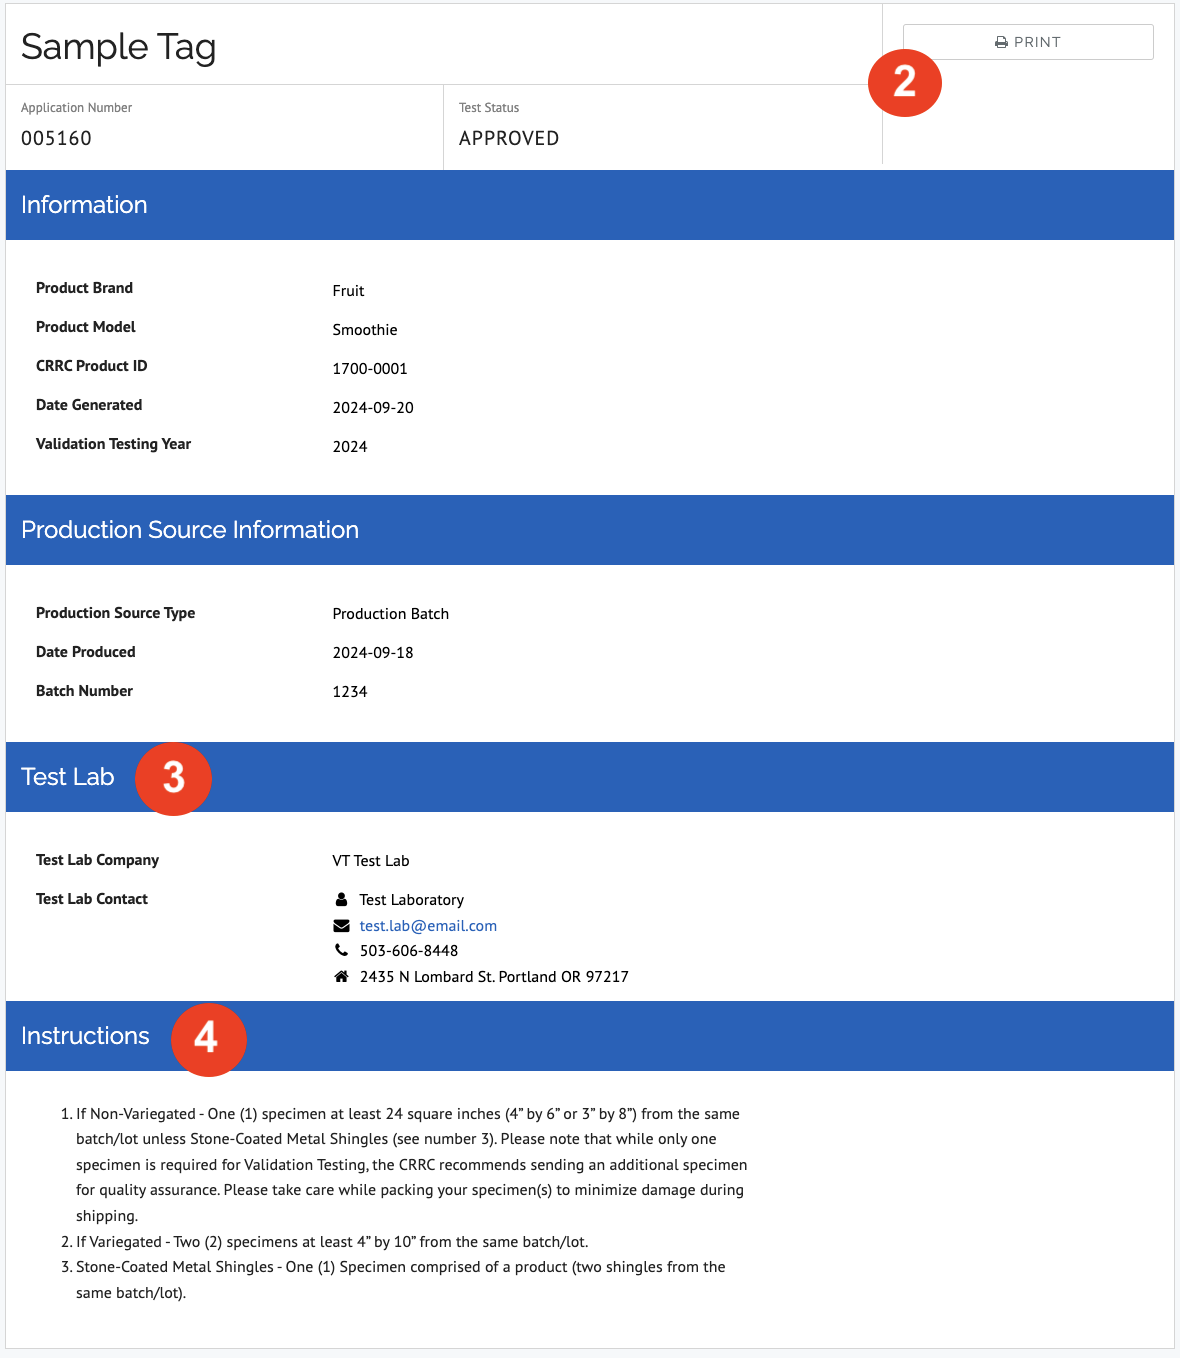
- Click “PRINT” in the top right corner of the Sample Tag.
- Send the specimen(s) to the Test Lab indicated in the Sample Tag.
- Prepare your specimen(s) in accordance with the instructions located in the Sample Tag, which are generated based on the Product Type in the application.
- Include the products’ Safety Data Sheet and Technical Data Sheet, if applicable.
Second Testing
If your product fails the first round of Validation Testing, you will be notified by email and instructed to submit the VT Production Source for a new batch of specimen(s) to be submitted for a second test. The process is the same as the first test:
- Submit VT Production Source
- Wait for Test Lab Assignment
- Print Sample Tag
- Send specimen(s) to the Test Lab
If your product fails the second test, it is considered to have failed Validation Testing and your product will automatically be terminated on December 31st of that year.
Validation Test Results
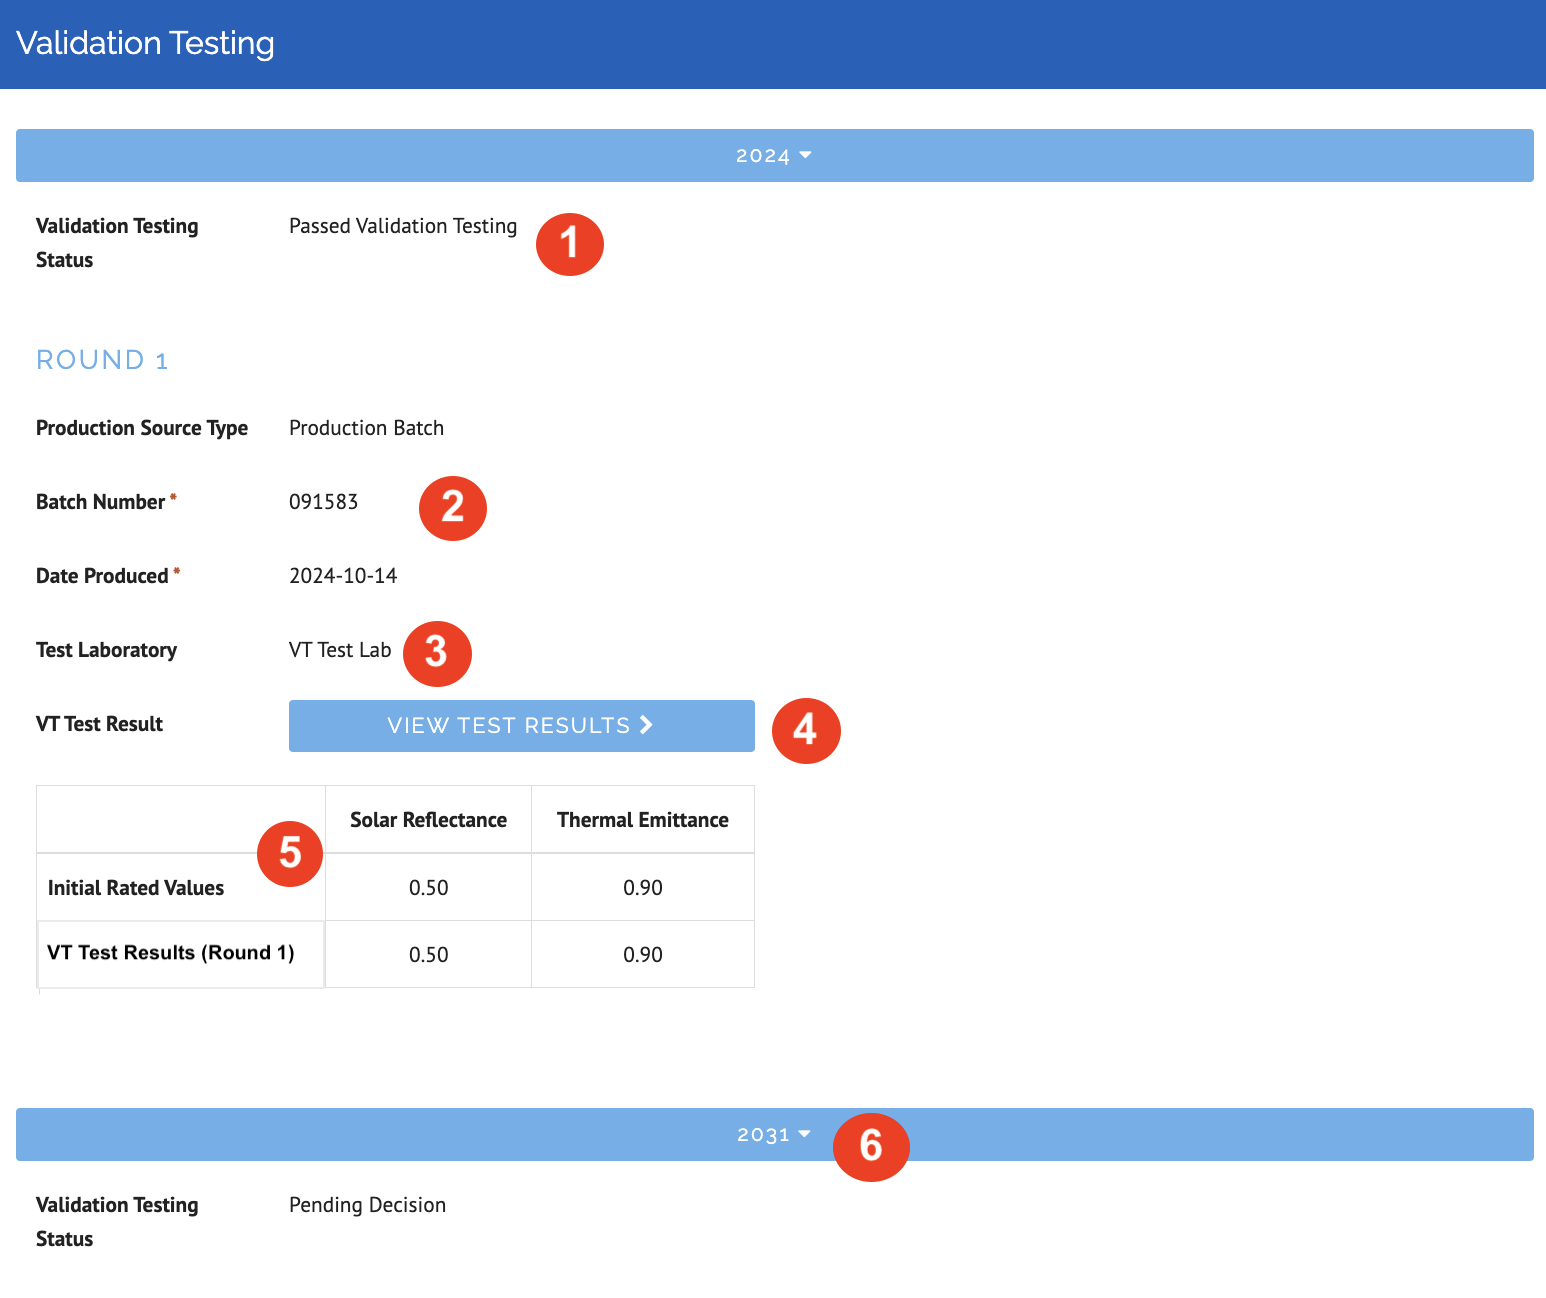
To view Validation Test Results, navigate to the Validation Testing section of the Application Overview by clicking on the Application ID from the Validation Testing Dashboard (located in the far-left hand column).
The Application Overview contains the following:
- Validation Testing Status
- The VT Production Source information submitted through the Validation Testing Dashboard
- The Test Lab assigned to complete testing
- The Validation Test Results, when submitted and reviewed by CRRC Staff
- A table containing the VT Test Results compared to the Initial Rated Values
- If the VT Test Results are approved, meaning they fall within the threshold to pass Validation Testing, then the Validation Status moves to Passed Validation Testing. When this occurs, a new row is automatically created for the next time Validation Testing is due (seven years from approval date).
Test Lab-Specific Portal Information
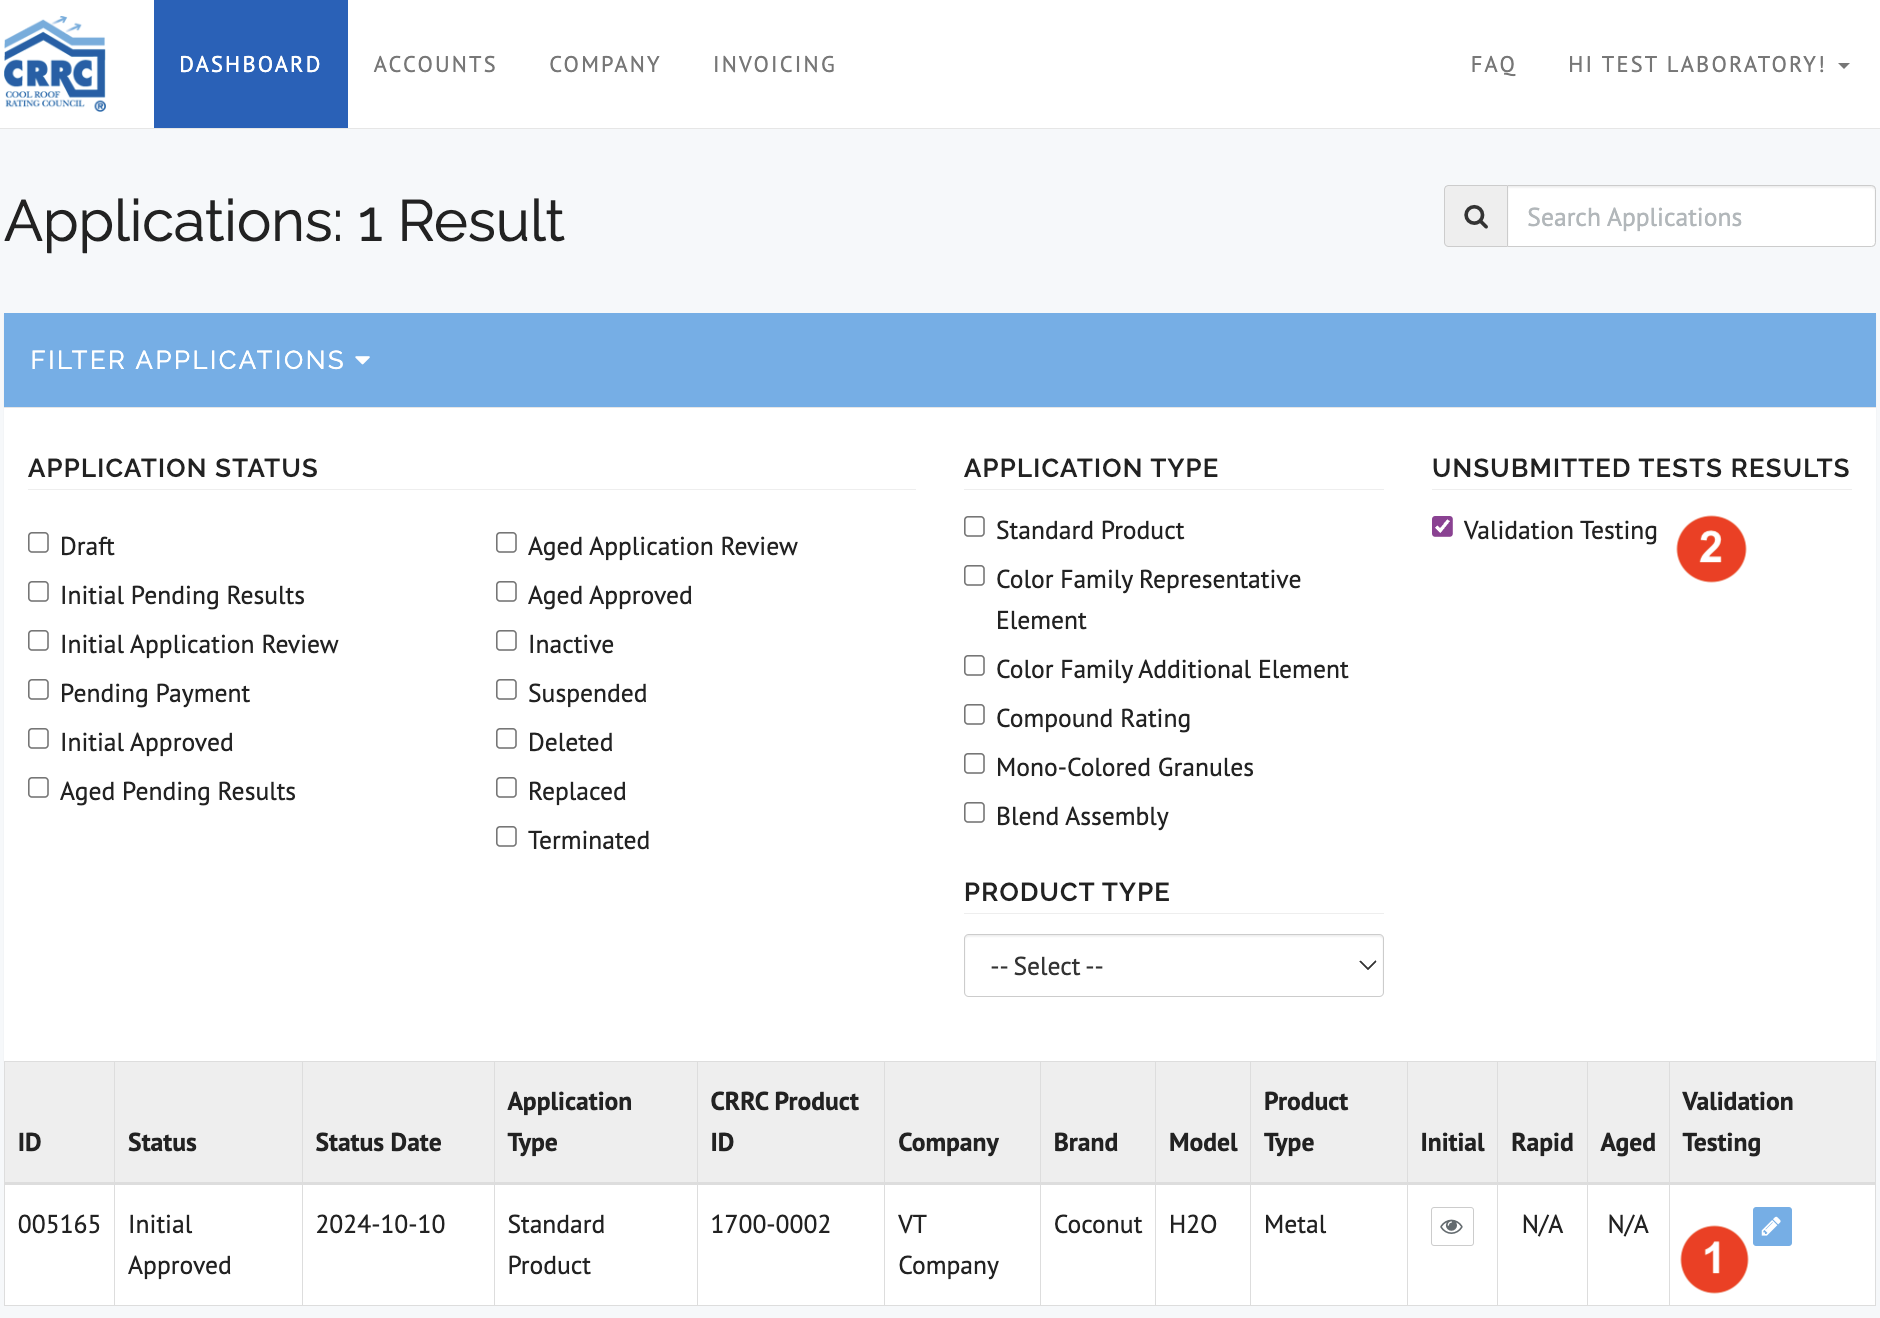
- Validation Testing Column - Test Labs do not have a separate Validation Testing Dashboard, rather a Validation Testing column has been added to the main Dashboard. When assigned as the Test Lab to conduct a Validation Test, an “Edit” icon will appear in the Validation Testing Column. The “Edit” icon only appears when Test Results need to be submitted.
- Unsubmitted Tests Results Filter - A filter has been added to allow Test Labs to filter for unsubmitted Validation Test Results. Clicking “Validation Testing” under Unsubmitted Tests Results will yield results for any applications that require Validation Test Results to be submitted.